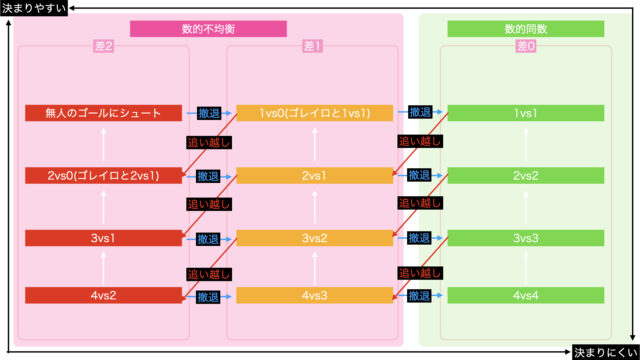
In transitions, situations of 2vs1 and 3vs2 occur most frequently.
At first glance, these situations might seem like easy opportunities to score, but they are surprisingly difficult.
This article explains, as a complete package, the attacking and defensive strategies in transitions that involve a one-player numerical disadvantage (1vs2, 2vs3), which is the most crucial scenario.
The principles explained here are universal – adaptable to various situations, including 1v1 play – and once mastered, they can significantly enhance your performance in matches.

2vs1
Before diving into the explanation of 2vs1, let’s first introduce a scenario where deliberately creating a 3vs1 situation can be advantageous.
Teammate Overtake > Opponent Withdrawal → Temporize
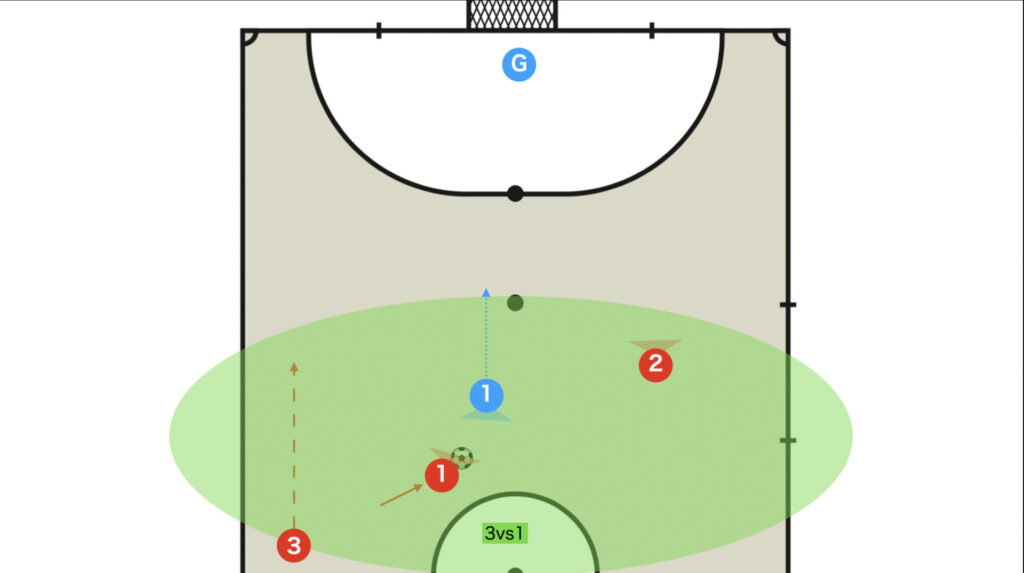
If a teammate overtakes more quickly than the opponent retreats, it is advisable for the ball holder to dribble inward while waiting (temporizing) to create a 3vs1 situation.
Since the play then transitions into a 3vs1 scenario, the essentials of attacking and defending in 3vs1 will not be covered here.
For those interested, please read the article on transition numerical imbalances, difference 2 (2vs0, 3vs1).

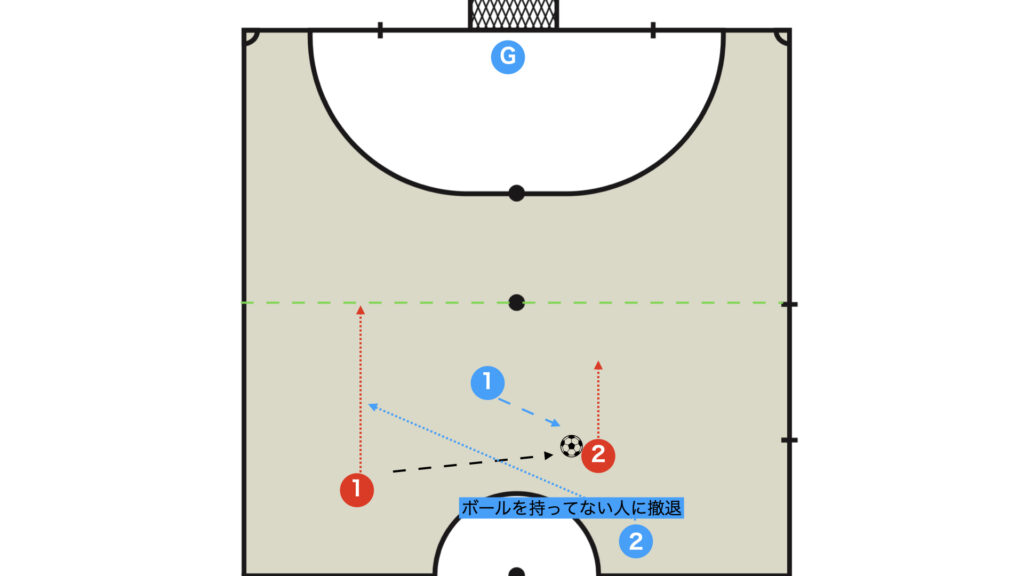
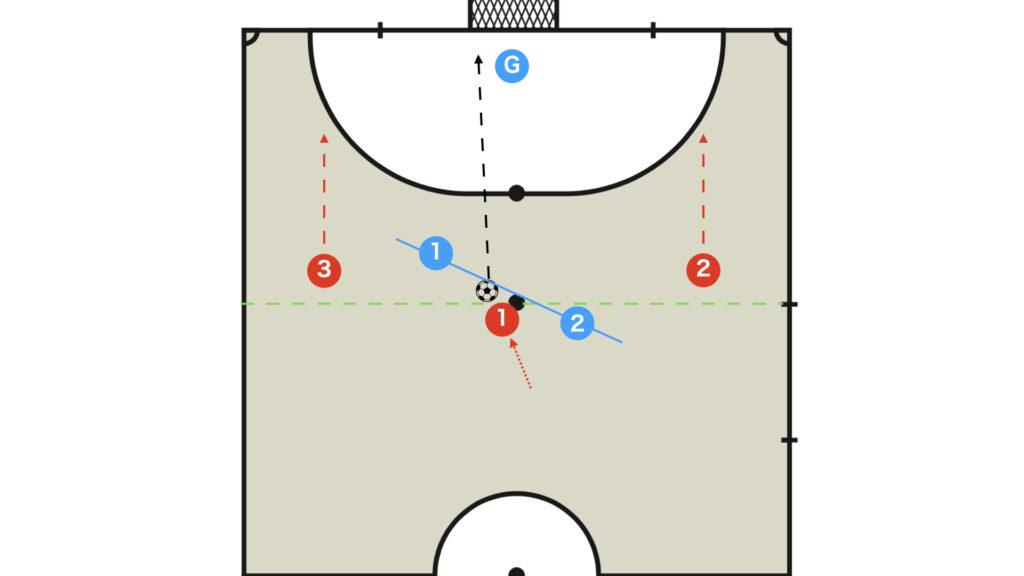
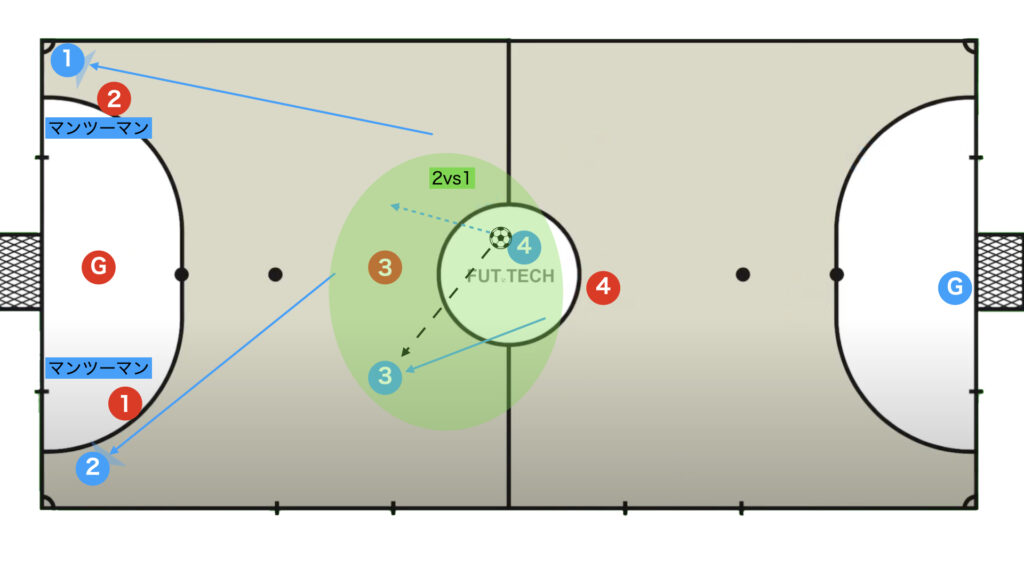
Defensive Strong Side and Weak Side
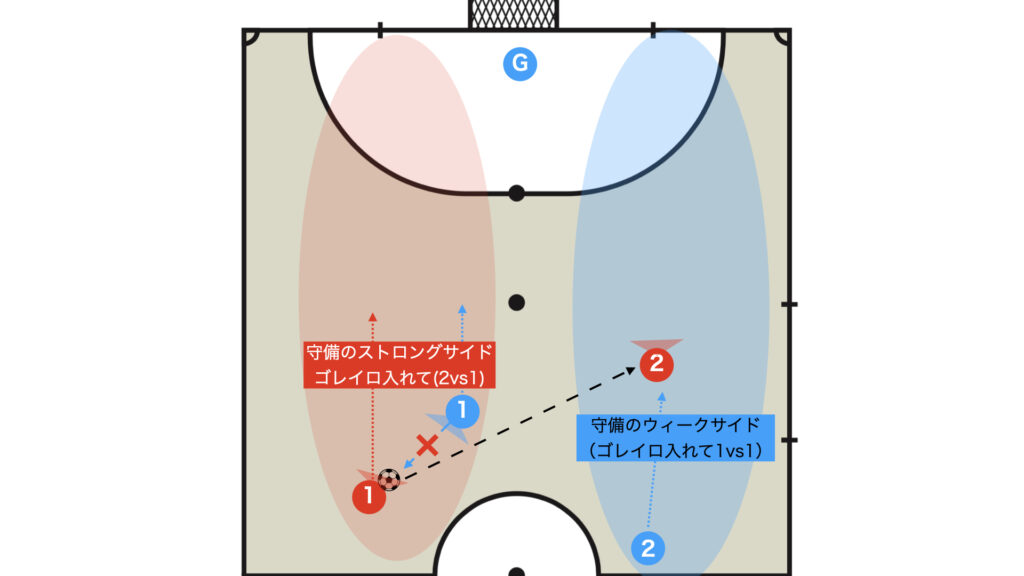
- Cut the passing lane to Red 2 to establish the defensive strong side
- Second Penalty Line – refrain from attacking up to this line, maintain an appropriate distance, and delay (i.e. retreat)
- Retreat to the defensive weak side, starting with the nearest defender (DF)
- Run towards the goal (avoid areas near the corner that offer no angle to the goal)
- Quickly deliver the ball to the defensive weak side
- The ball holder should always have the option to advance by dribbling as well as passing
Jump and Retreat
In the following situations, it is advisable for the DF to jump (pursue a second time):
- A pass that does not advance
- A short pass distance
- Poor-quality pass (weak, off-target, or floating)
- Trap error
In such cases, the defense forms a strong side on the opposite side; therefore, the retreating players will withdraw to that opposite side.
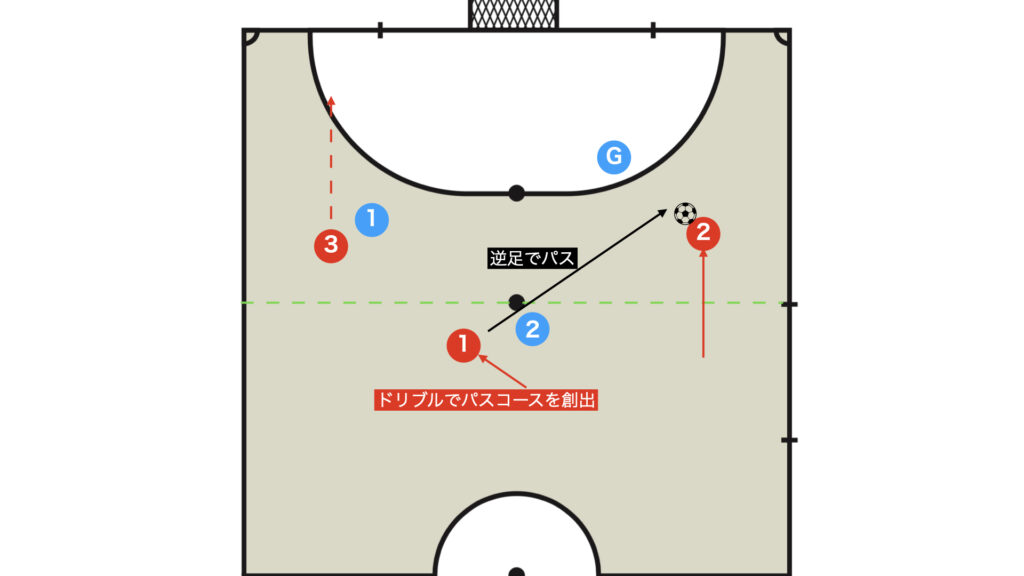
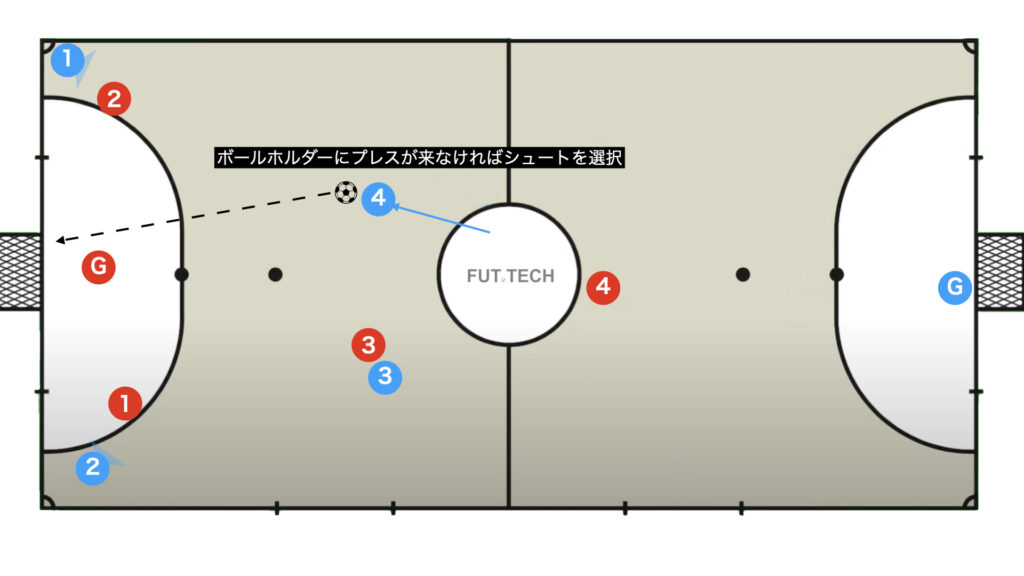
Attack at the Second Penalty Line
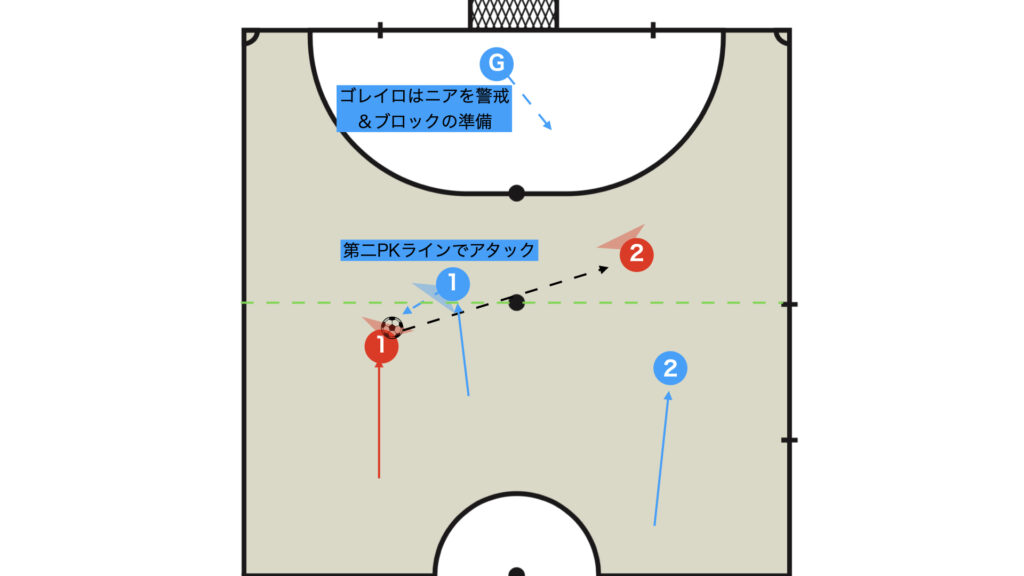
- Attack at the Second Penalty Line
- The Goleiro should be prepared to come out for a block when, while marking on the defensive weak side, he is wary of a near (vertical breakthrough followed by a shot)
- Always have the option to go it alone (advancing vertically – using segundo can be effective)
- Engage in the interplay of passing and dribbling (for example, a vertical breakthrough following a scissors move, etc.)
Offensive and Defensive Actions in the Defending Third
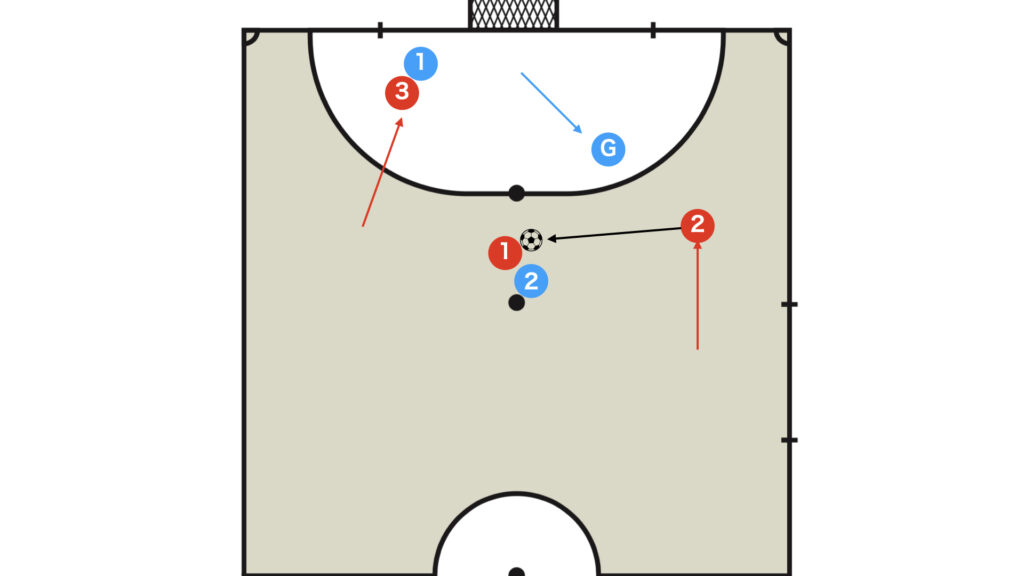
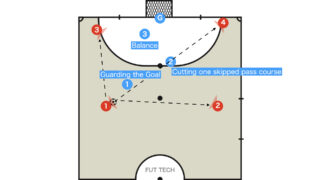
Defense: Block & Face Guard
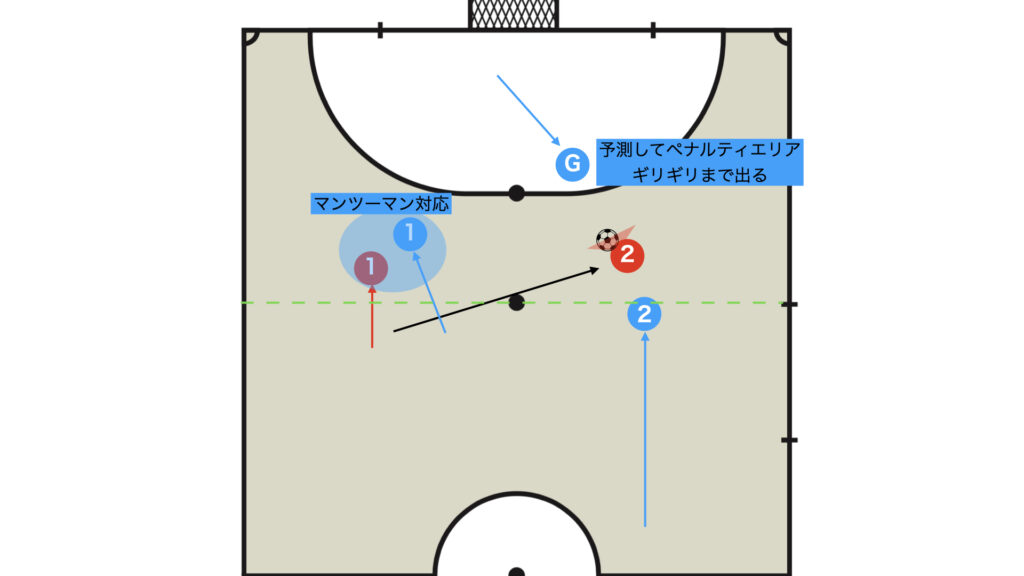
If the defensive weak side is drawn and the ball has advanced beyond the Second Penalty Line, the Goleiro will come forward to narrow the shooting angle (block).
At that moment, Blue 1 should mark Red 1 man-to-man (face guard).
Because by watching the opponent’s face and gaze, you can predict their next move – hence the term “face guard”.
Offense: Overcoming Face Guard
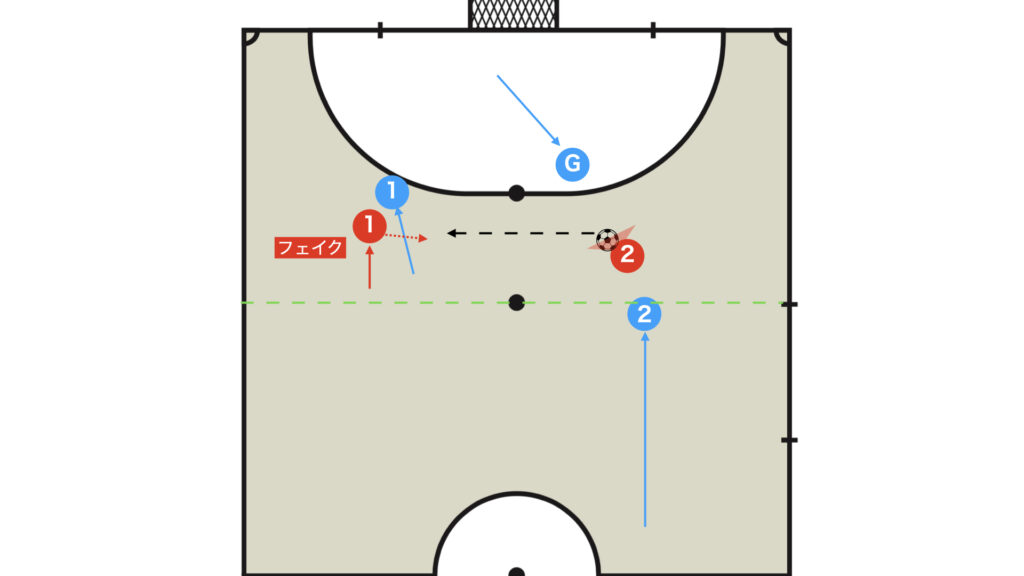
Since the opposing DF tends to follow his own marker, who is expected to run toward the Second Post, you can take advantage of this by faking and providing horizontal support to a teammate – allowing for a free shot at an unguarded goal.

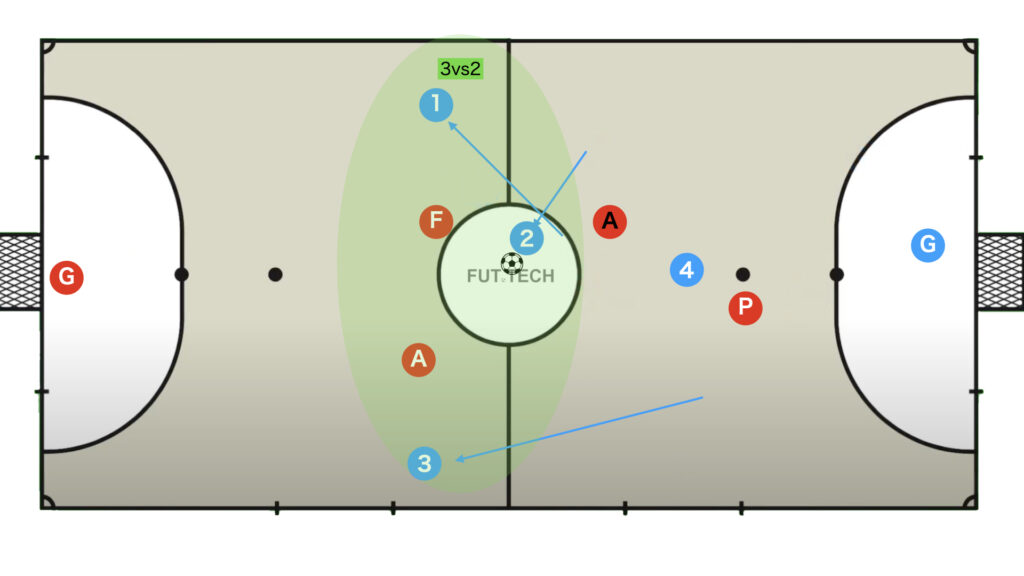
3vs2
Be Aware of the Three Lanes
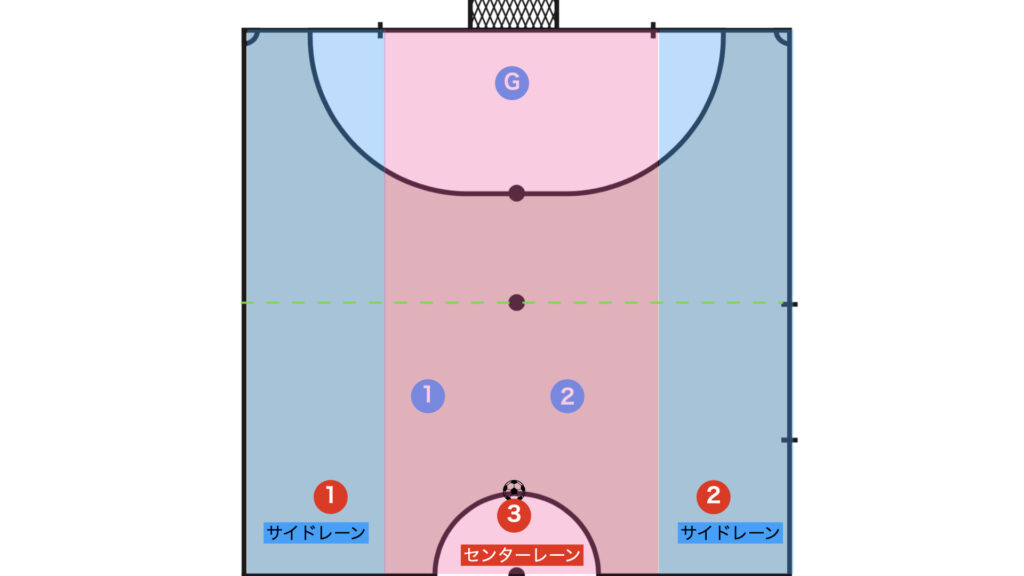
- Three Lanes – one player in each of the two side lanes and the center lane
- The ball must always be in the center lane (if on the side, bring it to the center) to secure passing lanes to both sides
- The players on the sides should overtake the center ball holder to create a forward passing option
- Players on both sides should avoid moving to goal areas with little angle (once past the Second Penalty Line, run toward the goal post)
Fill the center lane with two players (mind the spacing between them)
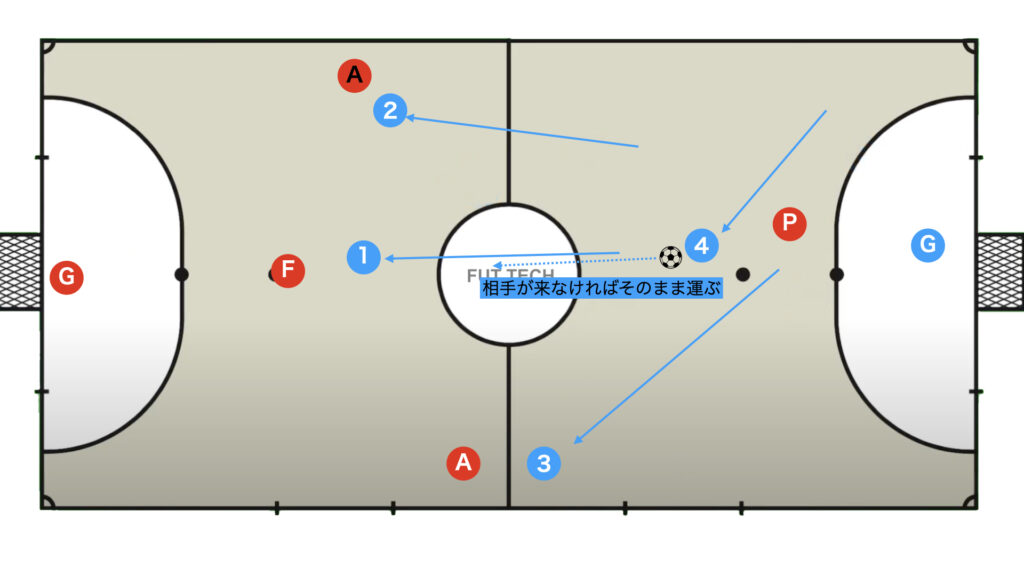
When the Ball Is on the Side
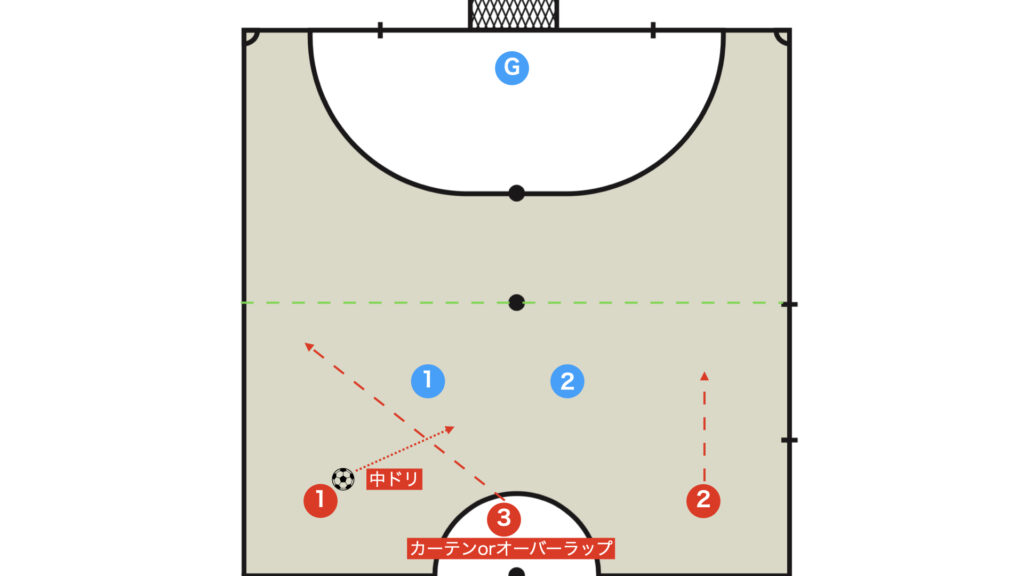
To secure passing lanes on both sides, always bring the ball to the center.
To do so, you can employ specific methods such as the curtain, block, or overlap.
In particular, the curtain is the most effective method because it also supports a teammate in dribbling in the center in better conditions.
Once the ball is brought to the center, the side players should overtake the ball holder (the center player).
Defensive Strong Side and Weak Side
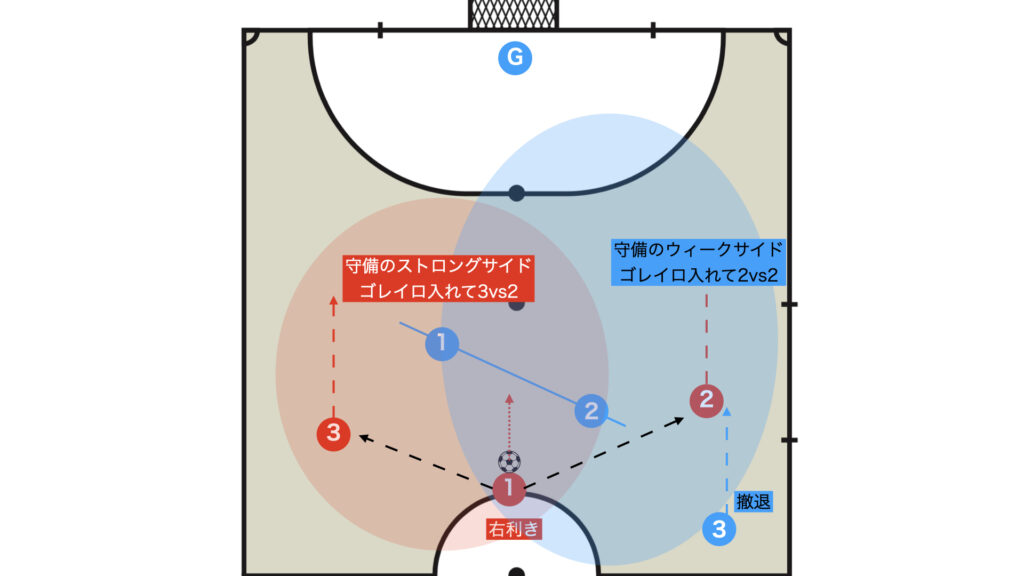
- Cut off the ball holder’s dominant foot side and build the defensive strong side
- Maintain an appropriate distance up to the Second Penalty Line and retreat
- Consider the attacking strong side in the same way as the 2vs1 transition
- Quickly transition to the defensive weak side, just like in 2vs1
- The ball holder should always have the option to go it alone (dribble or shoot) in addition to passing
It is generally believed that limiting play to the non-dominant side is preferable for two reasons: you do not want opponents to shoot with their dominant foot, and you do not want them to dribble past you using it.
Since most players are right-footed, when facing an unfamiliar opponent, it is common to restrict play to the right side.
Defense: Attack at the Second Penalty Line
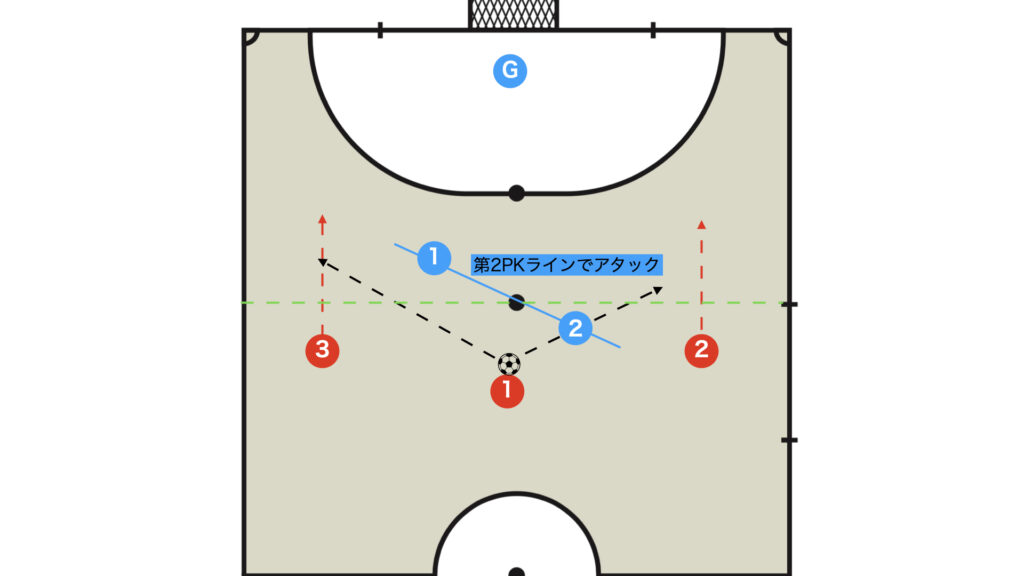
The DF should attack at the Second Penalty Line, while the offense initiates their attacking action just before being challenged.
Offense: How to Overcome the Defensive Weak Side
There are several techniques to transition to the weak side; they are introduced below.
Dribble and Pass
Since the opposing DF is limited to their dominant side, it is effective to dribble a bit to shift your angle, then pass to the defensive weak side using your opposite foot.
The technique of sliding the ball with the sole of the dominant foot to lure the opponent, then transitioning with the opposite foot to the weak side – famously used by Kensuke Nakai (ex-Pesca Dora Machida) – is also effective.
It is best to have at least one tangible option ready, no matter what it is.
Nutmeg Pass
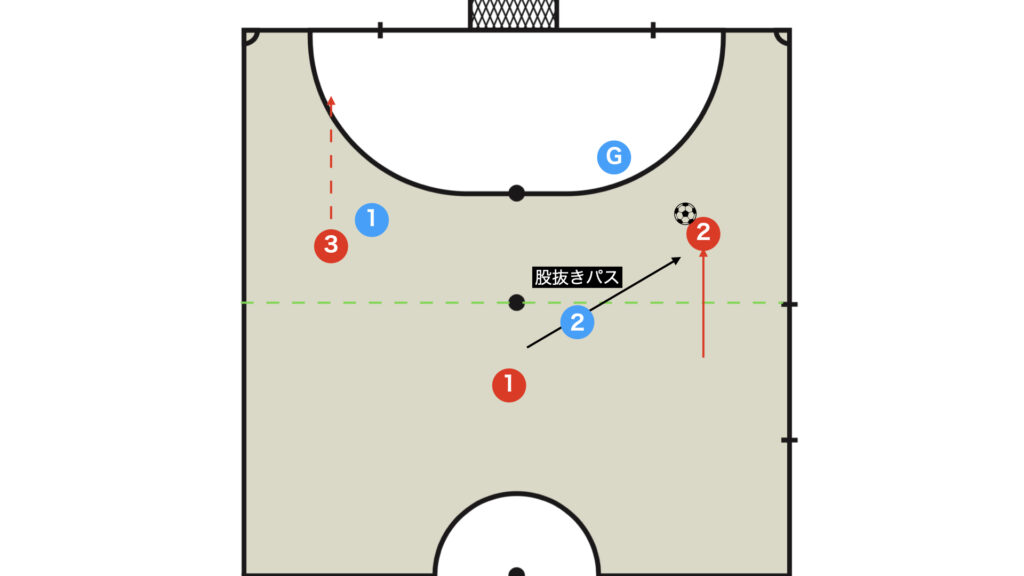
Since the DF must cover passing lanes while responding to a dribble, there is often space available to execute a nutmeg.
After Transitioning to the Weak Side: Consider a Return Pass
When the ball is played to the weak side, the Goleiro often comes out to block, making it challenging to win a 1vs1 against him.
In such cases, executing another return pass to set up a shot on an unguarded goal is effective.
Because the opposing DF will engage in man-to-man marking, there is no guarantee of always having a free option to receive the ball again.
Passing after drawing the opposing DF as far as possible increases the likelihood of breaking their mark.
Strategy for Attacking from the Defensive Strong Side
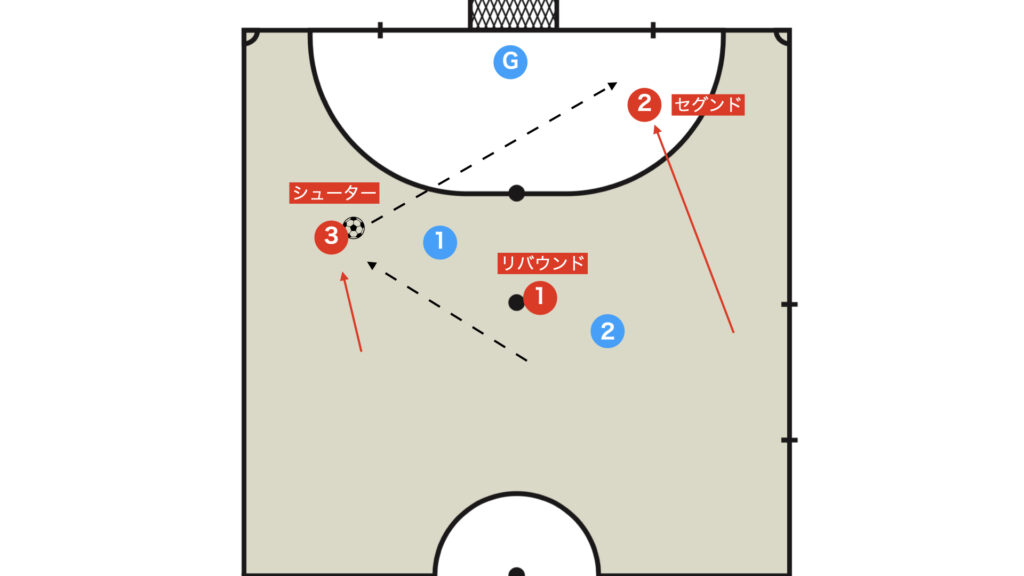
When attacking from the defensive strong side, it is ideal to form a finishing triangle and complete the attack in a simple, direct manner – preferably within two touches.
Always Have a Shooting Option
Players carrying the ball in the center lane often focus solely on passing; however, they should always consider the option of finishing the play themselves.
Be cautious, though – if your ability to shoot with your opposite foot is weak, the Goleiro might catch the ball and launch a counterattack.
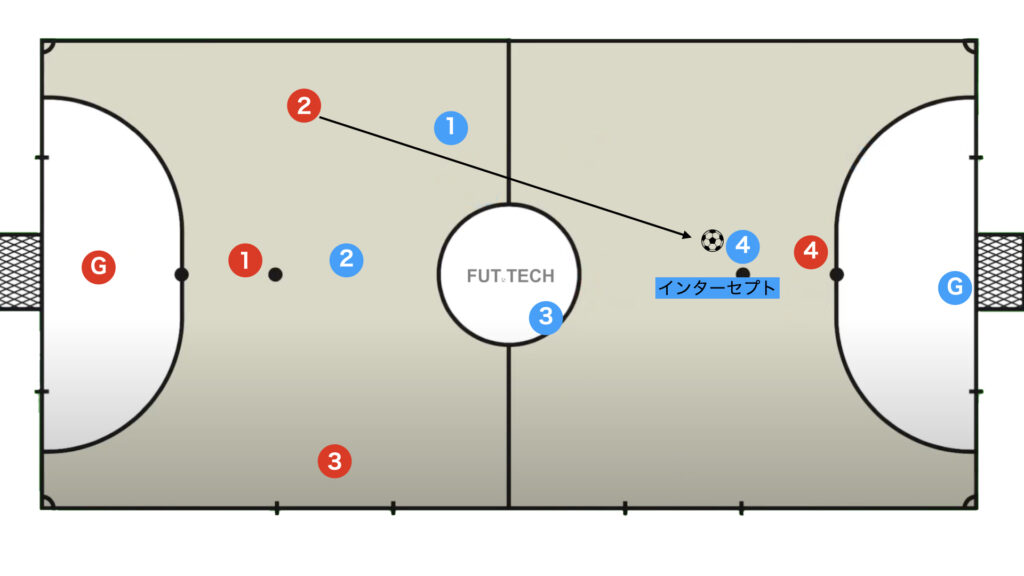
4vs3
The 3vs4 situation occurs when the fixo intercepts a pass aimed at the opponent’s pivo.
The attack should be executed by the first three players forming a finishing triangle, while the fixo at the rear maintains balance. If the fixo loses the ball at this point, it can lead to a counter-counterattack, which is extremely dangerous.
Therefore, it is crucial that the offense manages risks and executes a concise finish.
In the defending third, mark the opponents man-to-man and have the remaining FP deal with the local numerical disadvantage in the first line. (The pivo should promptly retreat to the first line as a non-ball holder.)
When the Intercepted Pass Aimed at the Pivo Occurs from a 3-1 Avoidance
The fixo who intercepts should first dribble the ball into the opponent’s half, while the other three reposition into an appropriate formation.
From here, there are two main attacking patterns:
- Place one pivo to create a 3vs2 numerical advantage in the second line
- Place two pivos to establish a 2vs1 numerical advantage in the second line
Once you penetrate the opponent’s half, the situation becomes somewhat similar to a red-card dismissal scenario (4vs3), so it is advisable to organize your play accordingly.
They differ in terms of mobility and the presence or absence of retreating players.
In dismissal scenarios, with no retreating players and a well-organized defense, a zonal marking is employed. In contrast, in a transition 3vs4, because there are retreating players, the defending third uses man-to-man marking, deliberately creates a numerical imbalance in the second line, and forces a rapid reorganization into a 4vs4.
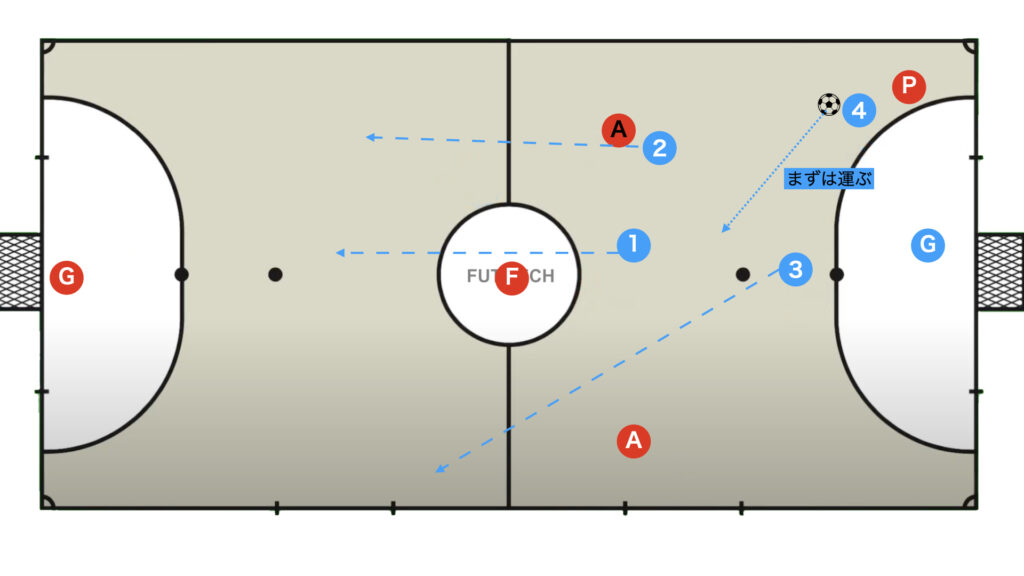
When One Player Is Positioned in the First Line, Creating a 3vs2 in the Second Line
- The fixo should dribble into the opponent’s half
- The pivo should move to the corner on the side opposite to their dominant foot
- The remaining two players should spread out and focus on creating a 3vs2 in the second line
- Mark the pivo that has penetrated into the defending third on a one-to-one basis
- The remaining player should cover the local 1vs2 defensive situation (forming the defensive strong side)
- Retreating players should withdraw to the defensive weak side (e.g., Red 4 retreats to the side of Blue 4’s dominant foot)
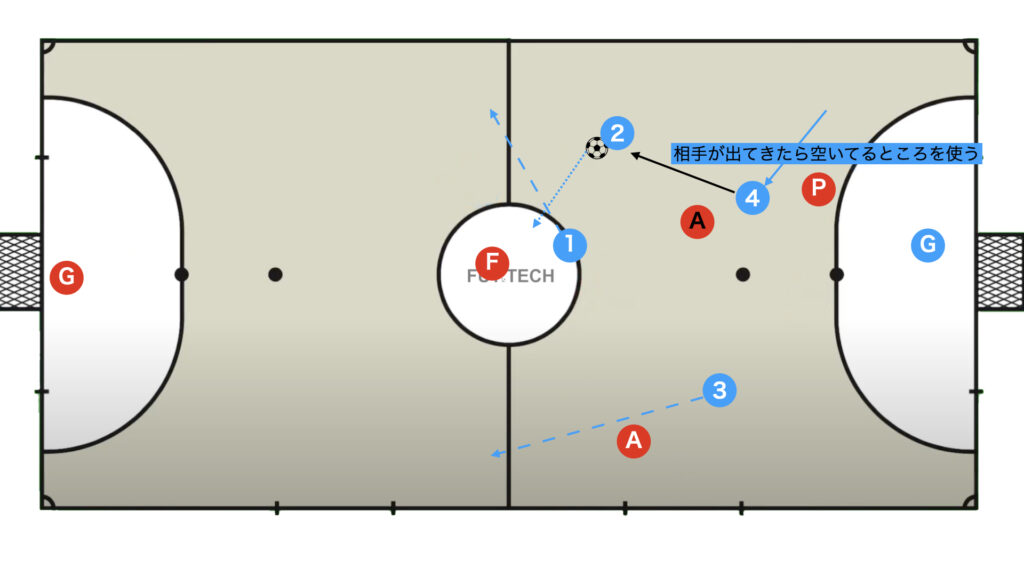
A 2vs1 numerical advantage can be created in the second line as shown; therefore, use the same approach as in the 2vs1 transition explained earlier.
If the opponent does not come out, proceed directly to finish.
When using the pivo, create a finishing triangle just as you would in the special 4vs3 finish.
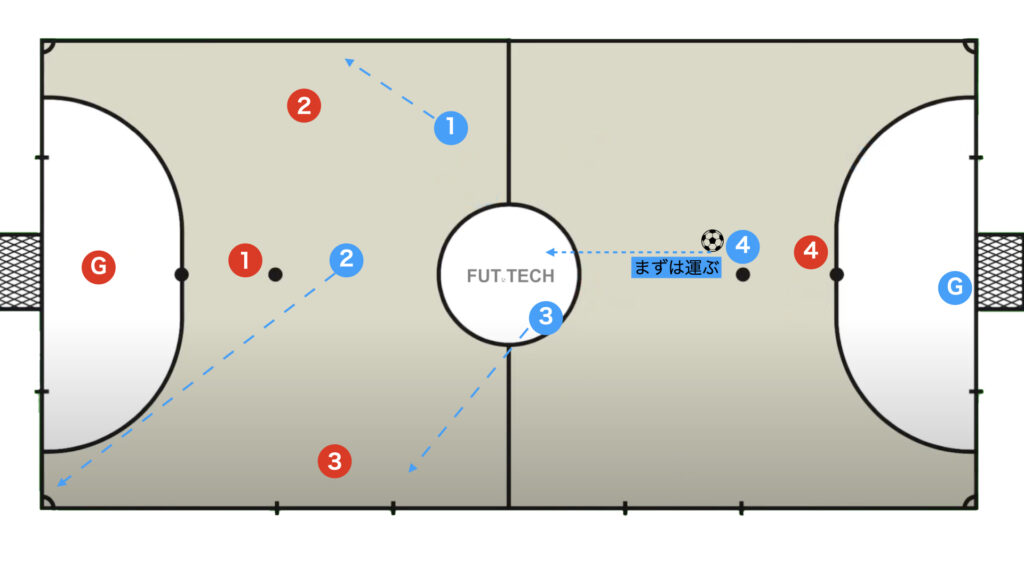
When the Pivo-Targeted Pass Is Intercepted in a Half-Court Defense

The player who intercepts should quickly drive forward with the ball via dribbling.
- Be mindful of the positional relationship between the ball, yourself, and the opponent (pivo) to avoid having the ball taken back by the pivo
- Create more passing lanes by dribbling slightly toward the center
When the Opponent Is Drawn Out, Pass to the Open Player to Create a 3vs2
If the opponent is drawn out, immediately pass to the open space.
This shifts the situation from 4vs3 to 3vs2, and the player who passed (Blue 4) should then cease active participation in the attack and focus solely on maintaining balance from the back.
If the Opponent Does Not Approach, Penetrate Directly into the Opponent’s Half
If the opponent is not drawn out, continue to penetrate into the opponent’s half and attack using the same approach as in the intercepted avoidance scenario described earlier.
1vs1 with the Goleiro
If you’ve read this far, you’ve likely realized that in a one-player numerical disadvantage situation, when the defense is drawn to the weak side, a 1vs1 situation with the Goleiro eventually occurs.
Compared to soccer, winning a 1vs1 against the keeper in futsal is not easy.
By understanding the principles of the Goleiro’s defense (how to form a block, center of gravity, vectors, and gaze), you can more effectively overcome a 1vs1 with the Goleiro – please refer to the video for further insights.
How to Defend Against the Goleiro
Technique 1: Use a Kick Finta to Fake and Shoot
Technique 2: Shoot from a Nutmeg
Details are omitted this time, but nutmeg shots and loop shots are also very effective.
For those with the skills, why not also try moves like the roulette or heel lift?
Summary
The transition theory explained in this article is a universal principle that can be applied to any situation, including 1v1 play.
However, the way in which passing lanes are cut and attacking lines are set may vary slightly depending on the team.
Generally, it is advisable to use the Second (10m) Penalty Line – which is easily recognized by players – as a reference point, but you should adjust according to the abilities of your players, including the Goleiro.
Thank you very much for reading this article to the end.
If you found this article useful, please consider sharing it using the social media share buttons above.
We regularly share valuable insights on futsal tactics on Twitter, so if you haven’t followed us yet, we’d appreciate your support!
We are committed to raising the level of futsal in Japan by sharing high-quality information through discussions with individuals who have coaching experience in the F.League and overseas.
If you have any questions or notice any mistakes, feel free to leave a comment below.
We update our articles regularly, so if you’d like to keep reading, please bookmark our site or search for “FutTech”!