The inscribed angle subtended by arc AB is always constant, and
its measure is half that of the central angle corresponding to the arc.
- ∠ACB = ∠ADB
- ∠AOB = 2∠ACB = 2∠ADB
Application of the Inscribed Angle Theorem to the Futsal Court
As shown in the figure above, if you draw a circle with the goal of the futsal court as its center and apply the inscribed angle theorem, angles A and B become equal.
There is almost no angle near CK
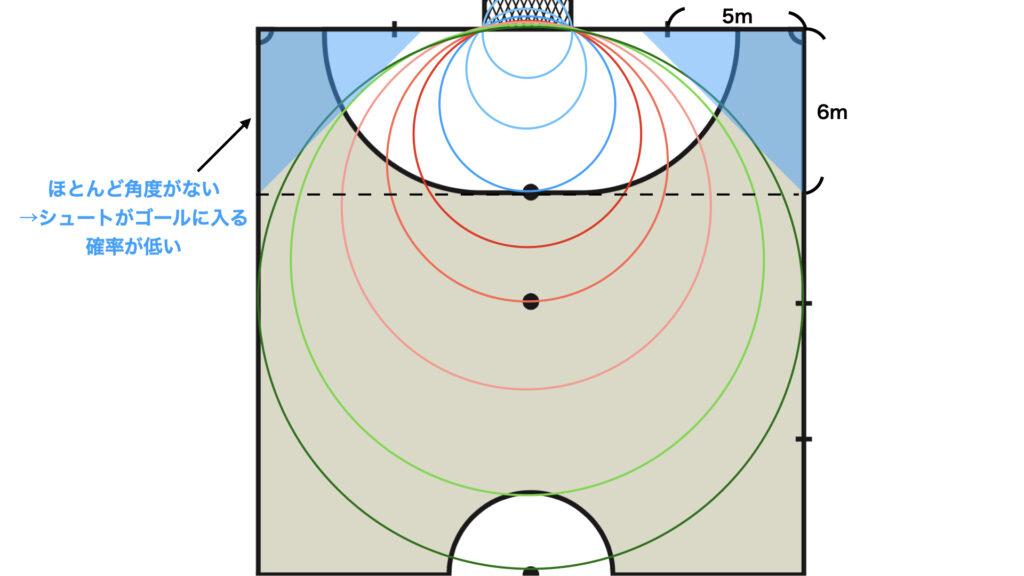
When drawing circles of varying sizes as introduced earlier, it becomes apparent that there is almost no angle near the corners.
Be Aware of the Penalty Area
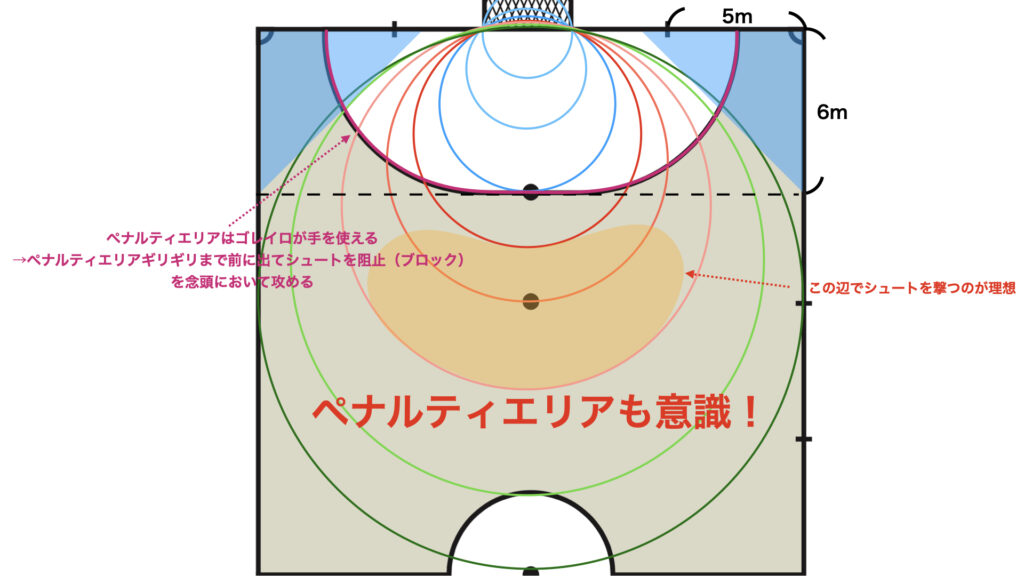
According to the rules, the goalkeeper can use their hands within the penalty area, so this zone cannot be ignored.
If you attempt a shot from a position close to the goal, the goalkeeper will come forward to block it, indicating that shots from the zone shown in orange are more effective.
The Three Zones and Principles of Action
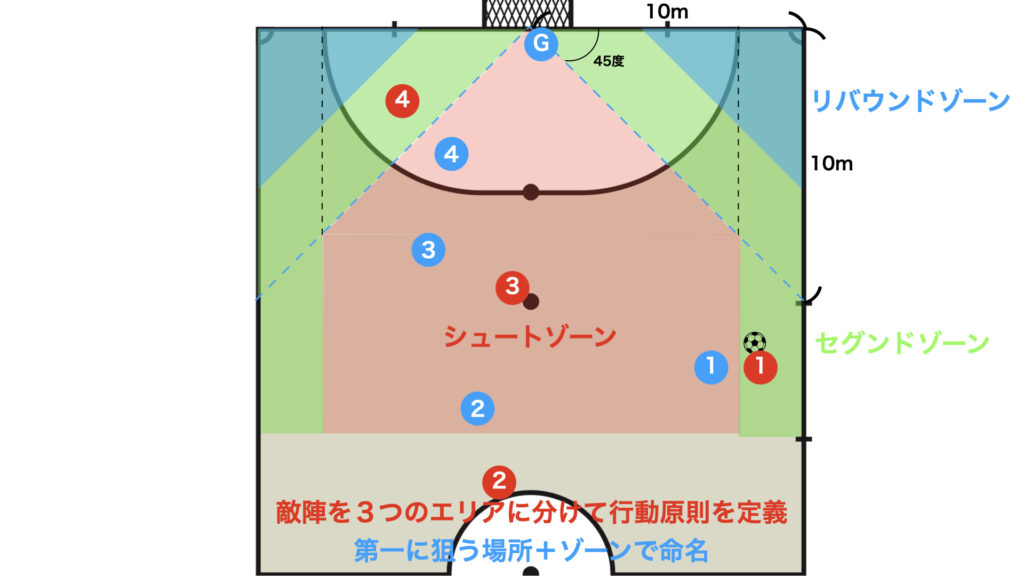
Based on the above content and the markers on the futsal court, the area can be broadly divided into the following three zones.
The principles of action for each zone are as follows:
- Shooting Zone: A zone where the primary aim is to shoot, and the shooter is also mindful of rebounds
- Segundo Zone: A zone where the primary aim is to secure the segundo
- Rebound Zone: A zone where, rather than taking a direct shot, opting for a turnaround to the segundo or rebound is recommended
Each will be explained in detail.
Shooting Zone
In the Shooting Zone, play is based on the following attacking principles:
- Red No.1, the shooter, takes the shot and is aware of rebounds after the shot
- Red No.4 occupies the rebound position near the far post
- Red No.3 occupies the rebound position near the near post (forming the triangle)
- Red No.2 covers the area around the center circle, taking on a balance role
Segundo Zone
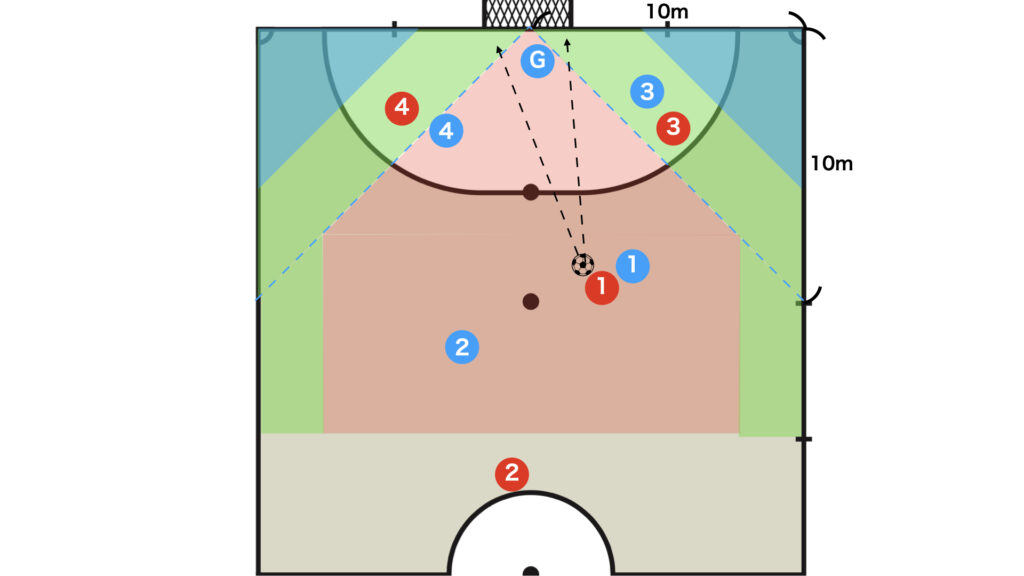
In the Segundo Zone, play is based on the following attacking principles:
- Red No.4 occupies the segundo position, and the shooter prioritizes aiming for the far side
- If a shot on the far side is difficult, Red No.1 will aim for a shot on the near side
- Red No.3 occupies the rebound position
- Red No.2 covers the area around the center circle, taking on a balance role
Rebound Zone
When holding the ball in the rebound position, since there is hardly any angle to the goal, it is important to pass to a player in a position with a better angle (potential) rather than taking a direct shot.
Of course, if a player possesses strong shooting ability (technique), they should take an active shot; however, resorting to a poorly aimed shot may allow the goalkeeper to catch it and trigger a counter, so making decisions with risk hedging in mind is essential.
In the Rebound Zone, play is based on the following attacking principles:
- Red No.3 prioritizes occupying the rebound position, and Red No.1 opts to pass to Red No.3
- If passing to Red No.3 is difficult, opt to pass to Red No.4, the segundo
- If Red No.1 determines that a pass in front of the goal is not effective, they become the pivo and create space on the front line
- If the above options 1–3 are difficult, pass back to Red No.2, who is in the balance position
When No One Is in the Rebound Zone
While it is ideal to always form the Finishing Triangle, if only one person is near the goal, it is effective to prioritize filling the Rebound Zone.
This approach has the advantage that, in the worst-case scenario, even if the ball is lost, a counter can be addressed immediately.
As shown in the figure above, initiating movement from the segundo into the defensive blind spot on the opponent’s reverse is effective.

Conclusion
This article has explained the important concepts that underpin all attacks.
These three zones are concepts that also apply to set-pieces such as FK walls, so please be sure to understand them.
By calculating the open shooting course using the similarity of triangles based on the distances from the ball to the wall and the goalkeeper, you can grasp the depth of futsal. If you are interested, try calculating it using the cosine theorem, etc.
“What do you usually think about when playing futsal?”
In futsal, thinking backwards from the goal is extremely important.
However, although thinking from the goal backward may sound too abstract, most people do not know how to approach it.
One approach is the concept of “Distance from the goal × Angle“.
This article demonstrates the one objective principle derived by calculating “Distance from the goal × Angle” using the inscribed angle theorem (geometry).
This concept is also crucial when considering the definition of set-pieces and the number of walls, making it a must-see for competitive futsal players.
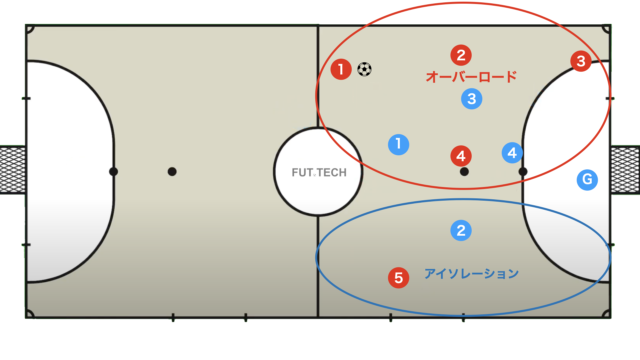
Basic Principles of Finishing
Formation of the Finishing Triangle (Triangle +1, Y-shape)
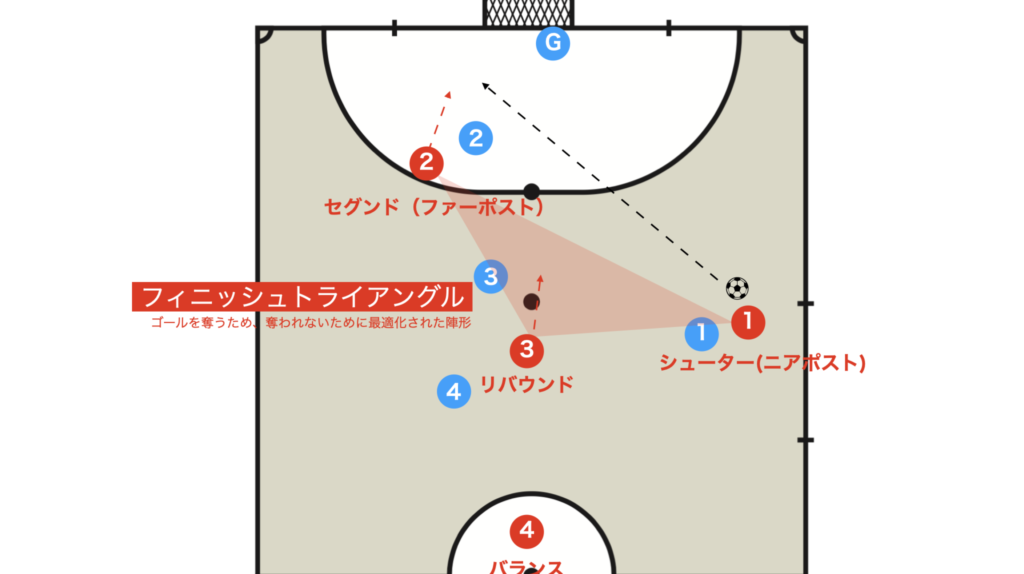
During finishing, creating a configuration of “triangle (shooter, segundo, rebound) + 1 (balance)” is considered an optimized formation for both scoring goals and preventing them.
This formation is called the Finishing Triangle, and the roles of each player are as follows:
- Shooter: Takes the shot or passes to the segundo (in some cases, also handles rebounds)
- Segundo: Positions near the far post
- Rebound: Collects loose balls and deals with counters
- Balance: Covers the last line and provides instructions
This theory is an unshakeable principle that can be proven geometrically to maximize one’s available space.
Gegenpress (Immediate, Counter-press)
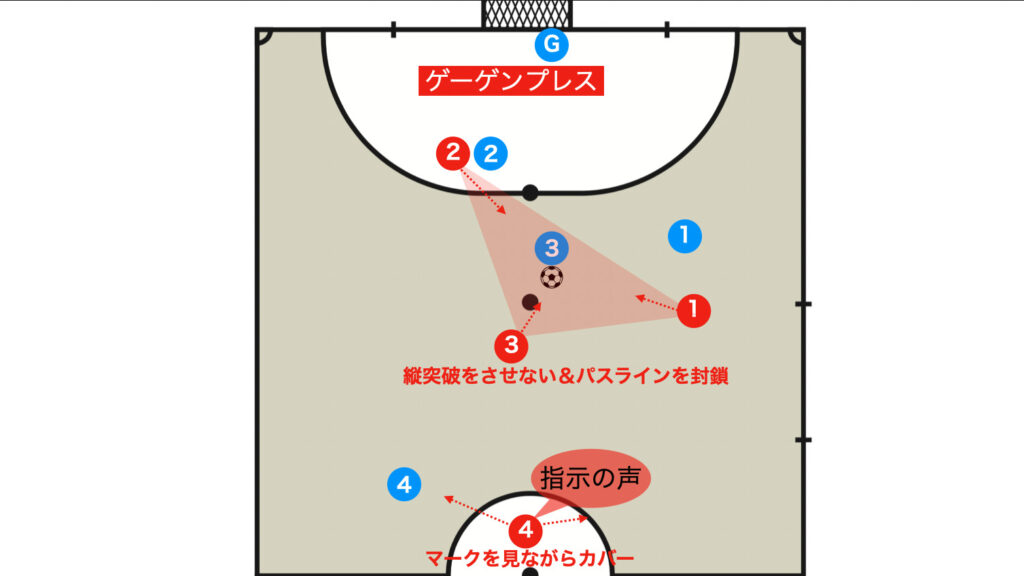
Liverpool, managed by Klopp, is known for a tactic called gegenpressing, in which the team immediately presses to win the ball back after losing it.
While a detailed explanation of gegenpress is omitted, the Finishing Triangle can also be considered the optimal formation for executing a gegenpress.
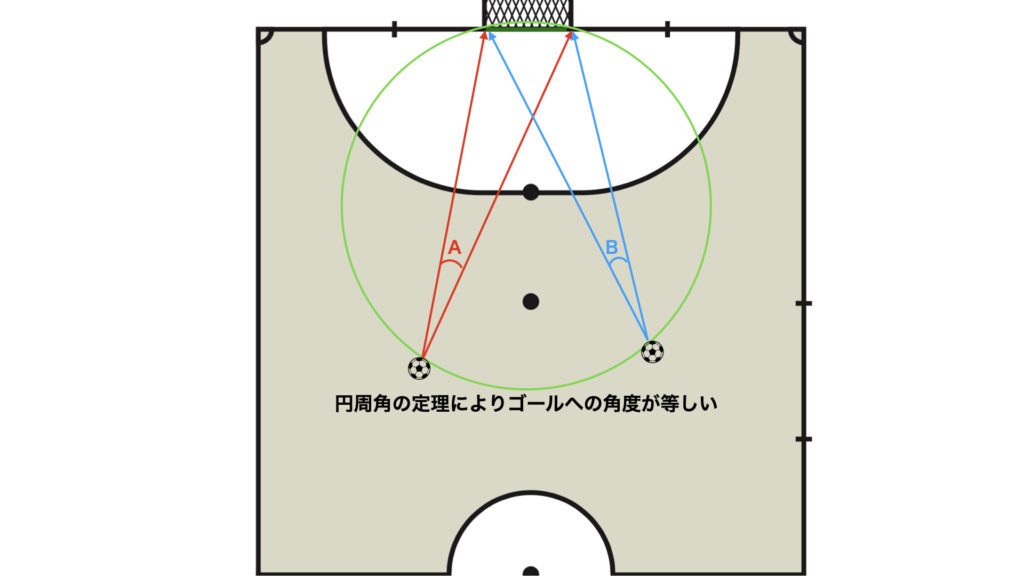
The Inscribed Angle Theorem
To calculate the angle from the goal, let’s first review the inscribed angle theorem, which is taught in middle school mathematics.
The inscribed angle subtended by arc AB is always constant, and
its measure is half that of the central angle corresponding to the arc.
- ∠ACB = ∠ADB
- ∠AOB = 2∠ACB = 2∠ADB
Application of the Inscribed Angle Theorem to the Futsal Court
As shown in the figure above, if you draw a circle with the goal of the futsal court as its center and apply the inscribed angle theorem, angles A and B become equal.
There is almost no angle near CK
When drawing circles of varying sizes as introduced earlier, it becomes apparent that there is almost no angle near the corners.
Be Aware of the Penalty Area
According to the rules, the goalkeeper can use their hands within the penalty area, so this zone cannot be ignored.
If you attempt a shot from a position close to the goal, the goalkeeper will come forward to block it, indicating that shots from the zone shown in orange are more effective.
The Three Zones and Principles of Action
Based on the above content and the markers on the futsal court, the area can be broadly divided into the following three zones.
The principles of action for each zone are as follows:
- Shooting Zone: A zone where the primary aim is to shoot, and the shooter is also mindful of rebounds
- Segundo Zone: A zone where the primary aim is to secure the segundo
- Rebound Zone: A zone where, rather than taking a direct shot, opting for a turnaround to the segundo or rebound is recommended
Each will be explained in detail.
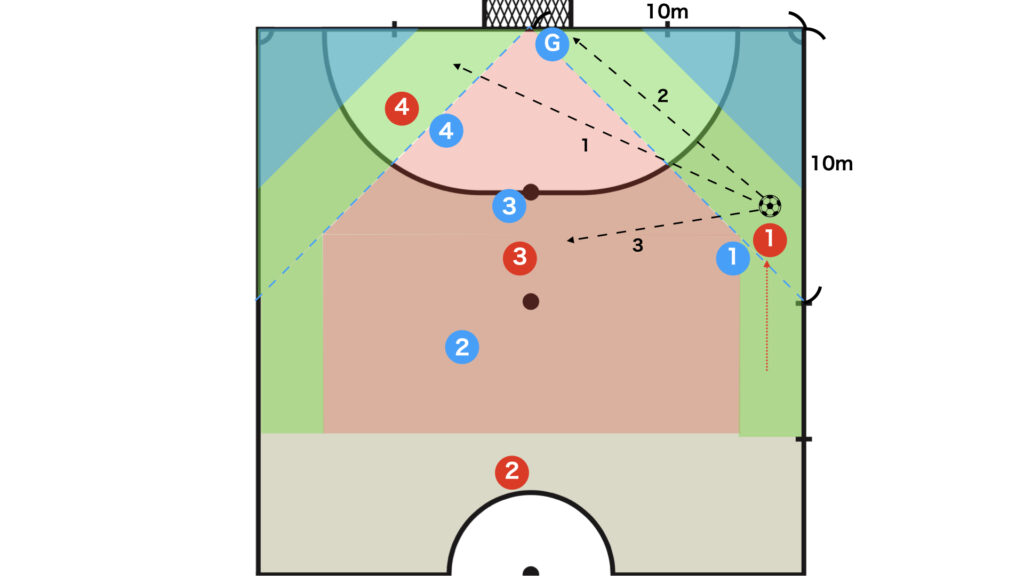
Shooting Zone
In the Shooting Zone, play is based on the following attacking principles:
- Red No.1, the shooter, takes the shot and is aware of rebounds after the shot
- Red No.4 occupies the rebound position near the far post
- Red No.3 occupies the rebound position near the near post (forming the triangle)
- Red No.2 covers the area around the center circle, taking on a balance role
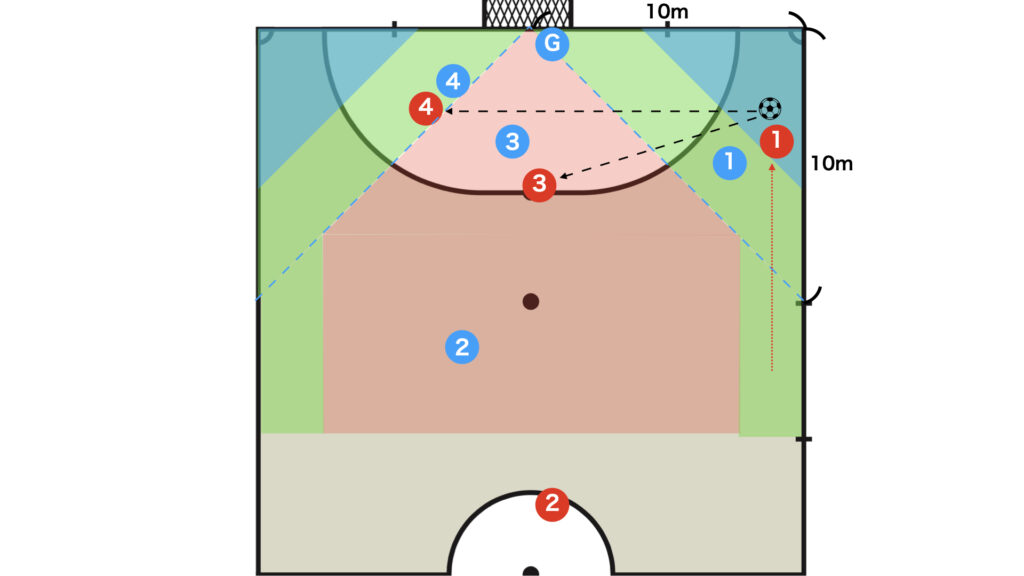
Segundo Zone
In the Segundo Zone, play is based on the following attacking principles:
- Red No.4 occupies the segundo position, and the shooter prioritizes aiming for the far side
- If a shot on the far side is difficult, Red No.1 will aim for a shot on the near side
- Red No.3 occupies the rebound position
- Red No.2 covers the area around the center circle, taking on a balance role
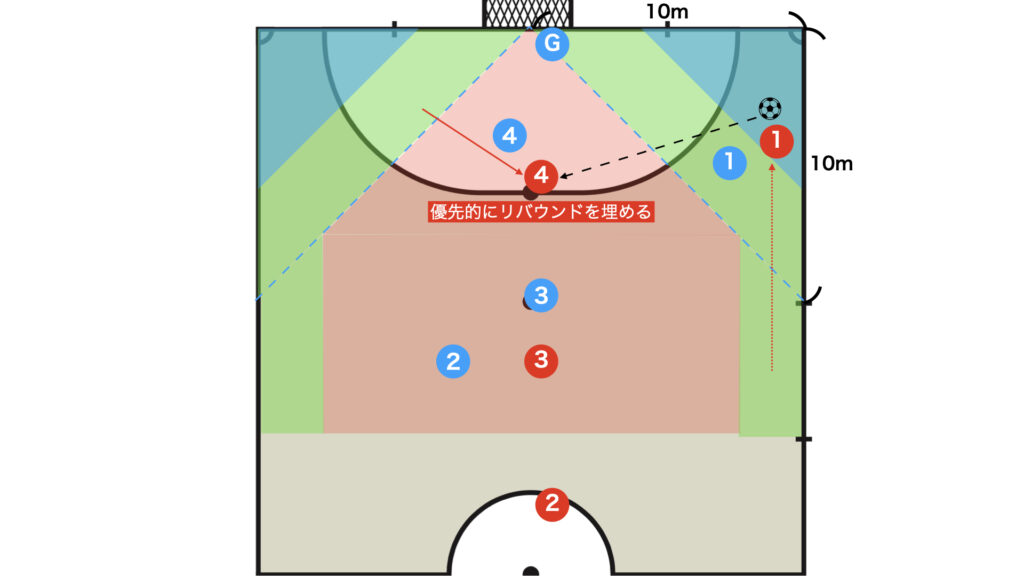
Rebound Zone
When holding the ball in the rebound position, since there is hardly any angle to the goal, it is important to pass to a player in a position with a better angle (potential) rather than taking a direct shot.
Of course, if a player possesses strong shooting ability (technique), they should take an active shot; however, resorting to a poorly aimed shot may allow the goalkeeper to catch it and trigger a counter, so making decisions with risk hedging in mind is essential.
In the Rebound Zone, play is based on the following attacking principles:
- Red No.3 prioritizes occupying the rebound position, and Red No.1 opts to pass to Red No.3
- If passing to Red No.3 is difficult, opt to pass to Red No.4, the segundo
- If Red No.1 determines that a pass in front of the goal is not effective, they become the pivo and create space on the front line
- If the above options 1–3 are difficult, pass back to Red No.2, who is in the balance position
When No One Is in the Rebound Zone
While it is ideal to always form the Finishing Triangle, if only one person is near the goal, it is effective to prioritize filling the Rebound Zone.
This approach has the advantage that, in the worst-case scenario, even if the ball is lost, a counter can be addressed immediately.
As shown in the figure above, initiating movement from the segundo into the defensive blind spot on the opponent’s reverse is effective.
Conclusion
This article has explained the important concepts that underpin all attacks.
These three zones are concepts that also apply to set-pieces such as FK walls, so please be sure to understand them.
By calculating the open shooting course using the similarity of triangles based on the distances from the ball to the wall and the goalkeeper, you can grasp the depth of futsal. If you are interested, try calculating it using the cosine theorem, etc.
Thank you very much for reading this article to the end.
If you found this article useful, please consider sharing it using the social media share buttons above.
We regularly share valuable insights on futsal tactics on Twitter, so if you haven’t followed us yet, we’d appreciate your support!
We are committed to raising the level of futsal in Japan by sharing high-quality information through discussions with individuals who have coaching experience in the F.League and overseas.
If you have any questions or notice any mistakes, feel free to leave a comment below.
We update our articles regularly, so if you’d like to keep reading, please bookmark our site or search for “FutTech”!