Various formations can be considered for a power play, but among them, the pyramid formation is so popular that it is widely adopted even at the highest levels.
This formation is highly aggressive; however, because the distance to the defence is so short, it carries the risk of conceding a goal with just a slight mistake, making it a double-edged sword.
This article explains the tactics of the pyramid formation.
Overview
Positioning and Body Orientation
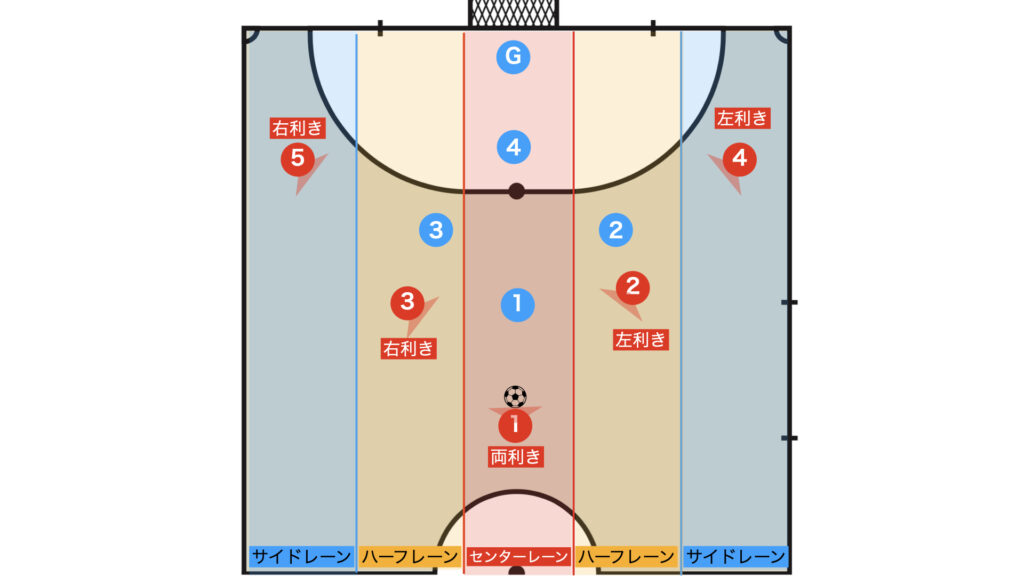
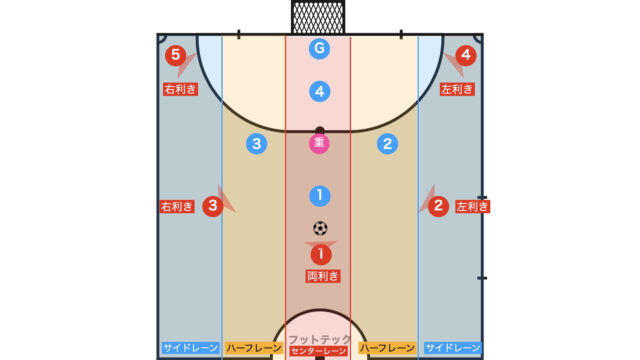
- The formation is arranged in a 1-2-2 shape (with the rearmost player always positioned in front of the second penalty keeper).
- Each player occupies a different lane.
- The player should use their stronger foot on the opposite side (it is preferable for the rearmost player to be ambidextrous).
- Visualize creating two groups of 3 on line on each side.
Tactical Intent
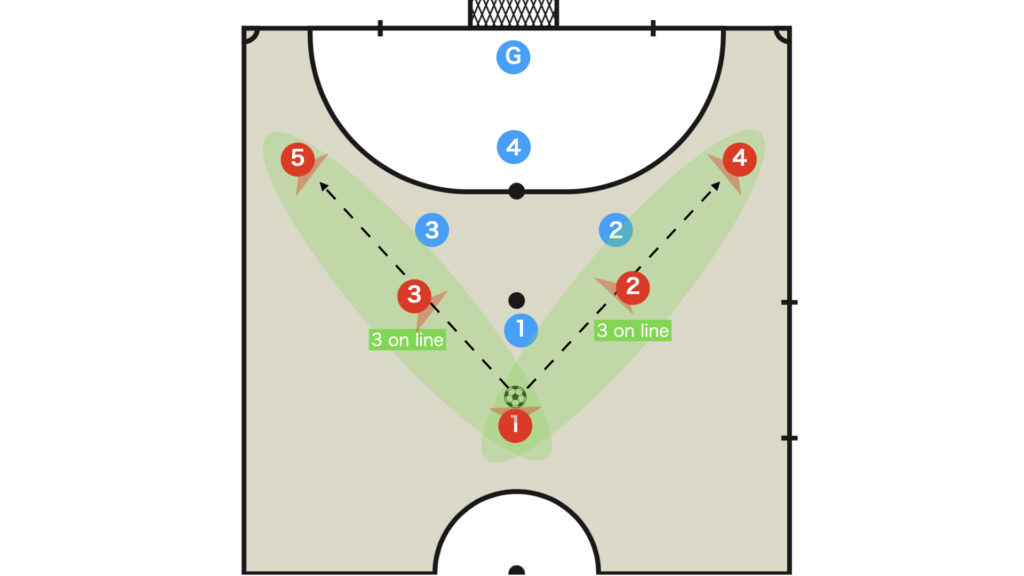
Create 3 on line on both sides, utilizing the threesome breakdowns from these formations.
The use of 3 on line delays the opponent’s defensive rotation and has the advantage of absorbing multiple lines.
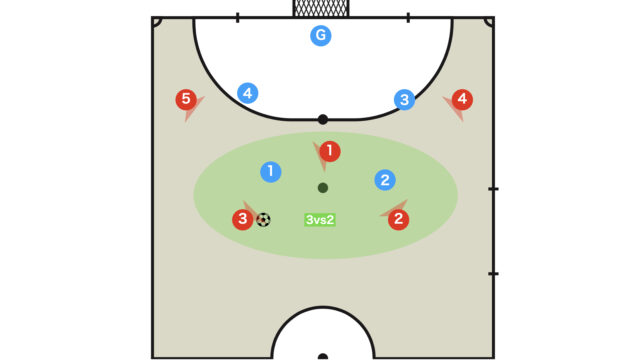
Possession
If the rearmost player holds the ball, they risk being trapped by the defence, so it is essential to pass quickly and maintain possession while waiting for an opportunity.
Passing Exchange with the Second Line
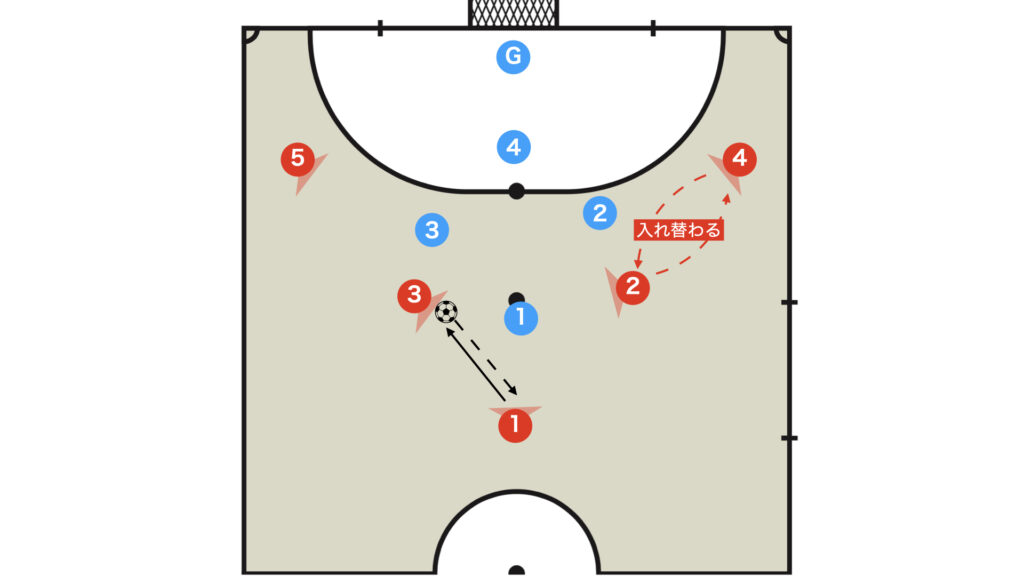
The basic principle is to exchange passes with the second line using a two-touch under (preferably direct).
During this exchange, the opposite side may switch positions (rotate), which can sometimes be effective.
Rotation can confuse and disrupt the opponent’s defence, so take advantage of those openings.
When the Pass Reaches the Front Line
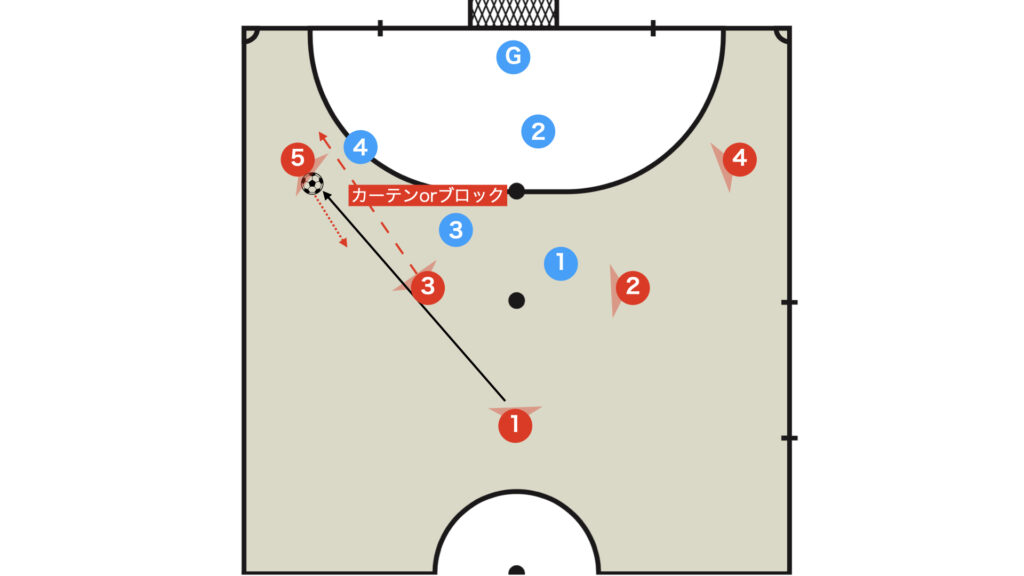
If the pass reaches the front line and the opponent’s rotation (adjustment) is in time, it is effective for Red No. 3 to provide support with a curtain or block, allowing Red No. 5 to execute a Central dribble.
This maneuver causes Red No. 3 and Red No. 5 to swap positions.
Breakdown

Simply holding the ball will not create a goal-scoring opportunity, so it is imperative that the team shares a common understanding to take actions that break down the defensive structure.
Diagonal Pass for a Long Pass
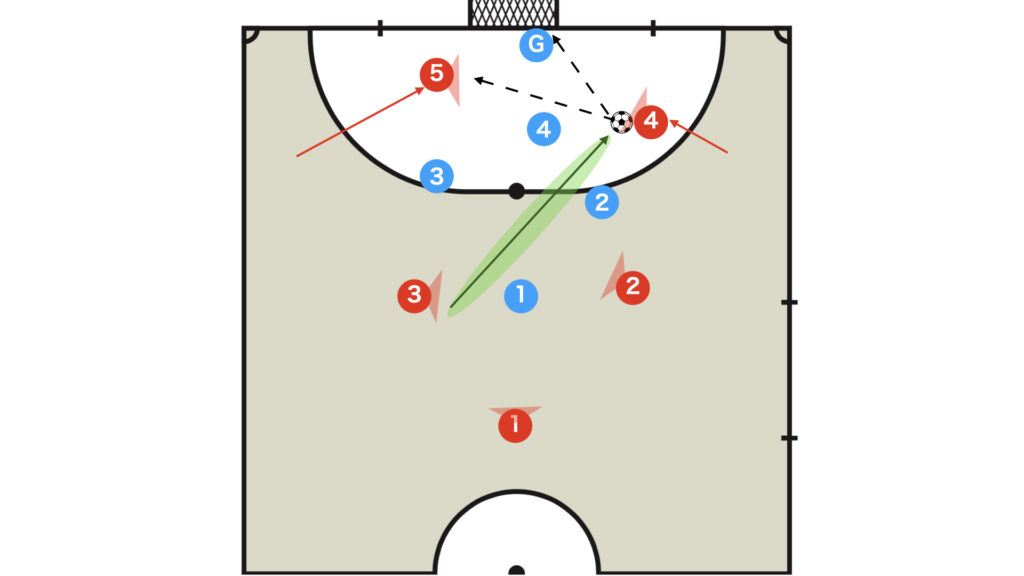
This long pass is the most effective, so it should be targeted first.
Compared to the house formation, the distance of this diagonal pass (indicated by the green arrow in the diagram) is shorter, making it relatively easier to complete – one of the attractive features of this formation.
When the Ball Reaches the Front Line
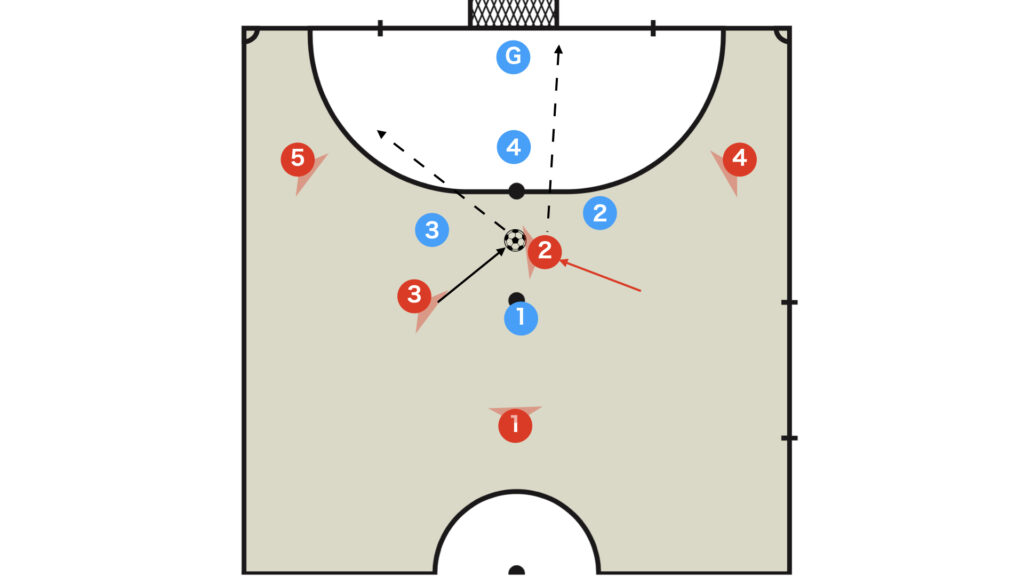
Pisada
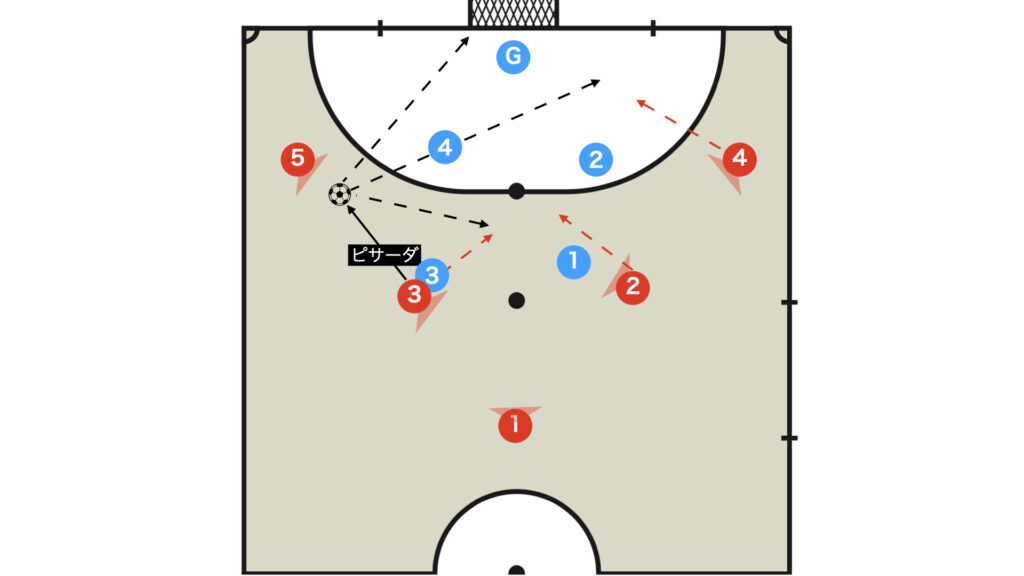
If an opponent presses while the pass exchange is underway, execute a pisada to break into a rebound position.
At that time, Red No. 2 should move into the rebound position and form a finishing triangle. This also aims to prevent a PP counterattack through a double rebound.
The priority for Red No. 5 is as follows:
- Direct shot (near)
- Pass to segundo
- Pass to the rebound
Red No. 5 should aim for a one-touch play following this priority.
If there is a lack of confidence in shooting, it is acceptable to remove the option of a direct shot.
If there is no clear outlet, drop back and reorganize.
Skip Pass (Through)
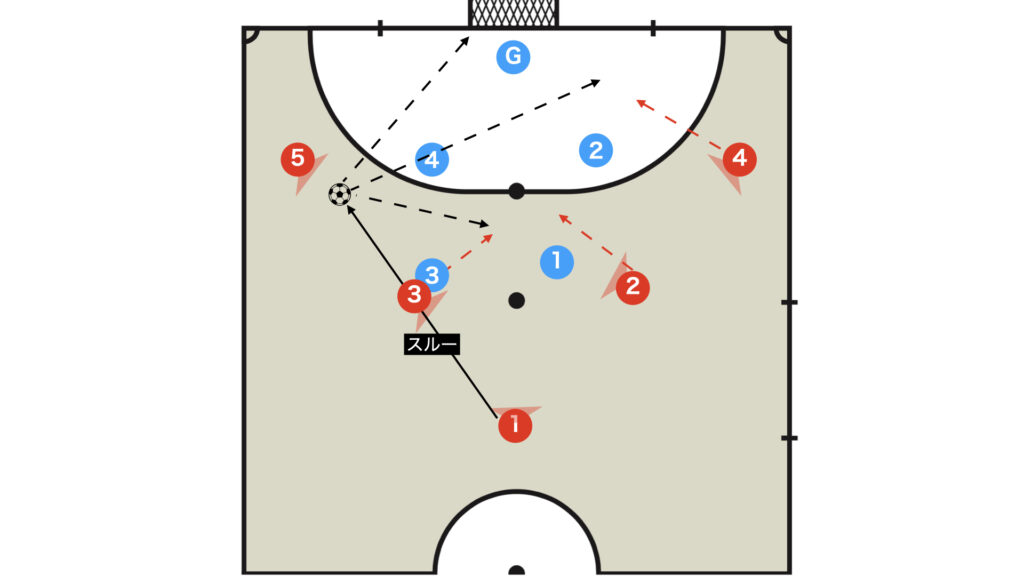
Secure the passing lane by positioning your body, then execute a through skip pass.
Subsequent breakdowns follow the same principles as in the pisada.
Ala Corta
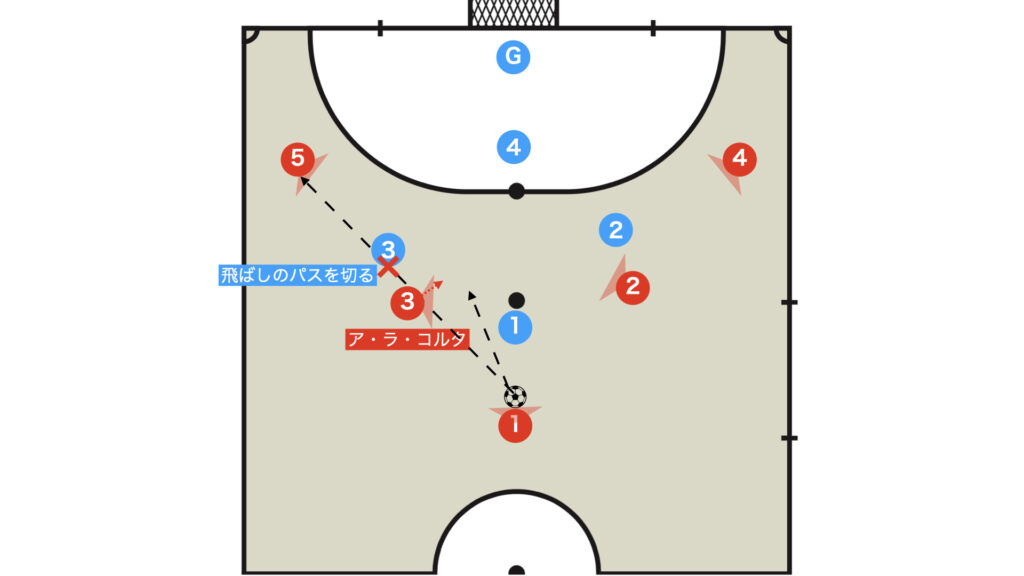
When long passes are overused, opponents begin to anticipate them as shown in the diagram above, so use Ala Corta to open up the play on the front.
Ala Corta requires a shared understanding between the passer and the receiver, so it is advisable to agree on eye contact or signals beforehand.

The priority for Red No. 3 is as follows:
- Direct shot (near)
- Pass to segundo (Red No. 4)
- Ankle pass to Red No. 5
- Pass to Red No. 2
Inserting a Player Between the Lines (Overload)
Although the formation changes slightly, having a player from the second line move between the lines can be extremely effective.
Summary
While the essence of this formation is not particularly difficult to understand, executing it in practice requires a high level of technical skill.
In particular, direct passes and quick decision-making are indispensable, so strive to improve these qualities through daily training.
Thank you very much for reading this article to the end.
If you found this article useful, please consider sharing it using the social media share buttons above.
We regularly share valuable insights on futsal tactics on Twitter, so if you haven’t followed us yet, we’d appreciate your support!
We are committed to raising the level of futsal in Japan by sharing high-quality information through discussions with individuals who have coaching experience in the F.League and overseas.
If you have any questions or notice any mistakes, feel free to leave a comment below.
We update our articles regularly, so if you’d like to keep reading, please bookmark our site or search for “FutTech”!