For most people who are new to futsal, isn’t it the case that they only know how to defend against quatro-zero (4-0) using man-to-man defence?
However, when facing an opponent who is relatively experienced with quatro, employing a man-to-man defence without any marking exchanges can lead to a barrage of goals.
It is extremely dangerous for teams with low individual ability to rely on man-to-man defence, as it exposes them to risks of being outmaneuvered from behind and having their space exploited!
There are various ways to defend against quatro, but it can be said that defending with a slightly man-to-man, rotating quadrilateral (box) formation is the safest.
If every member of the team masters this defence, quatro will no longer be intimidating.
The concept of constructing multiple defence lines becomes very important in reading this article.
If you haven’t read the article below yet, please do so before continuing.
Basic Principles
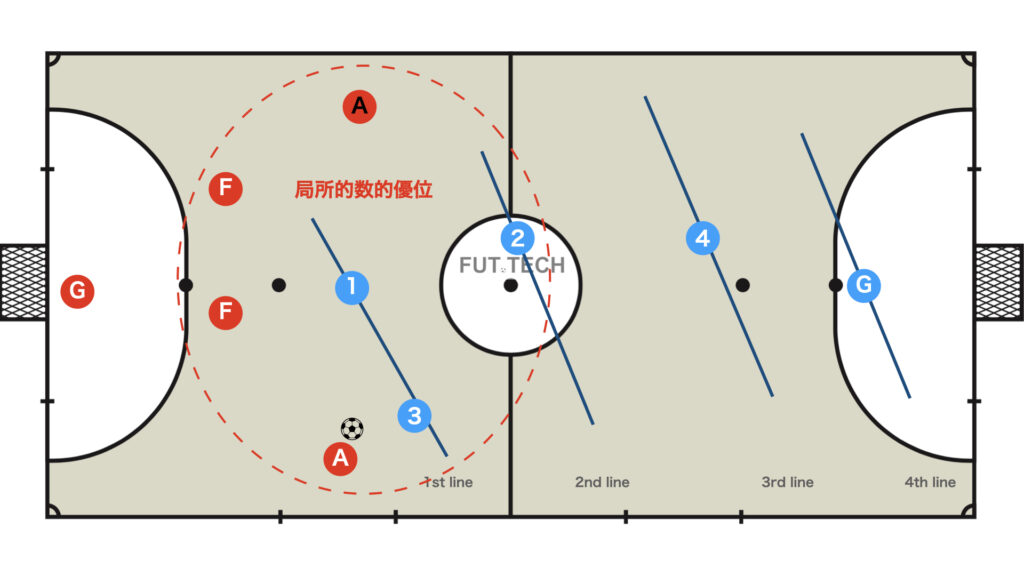
Keep the Spacing Between Multiple Lines and the Quadrilateral Compact

Blue No.4 should not cling to the ala; rather, as shown in the diagram above, it is important to maintain compact spacing between the lines.
Furthermore, by keeping the spacing among the four players in the form of a parallelogram (or diamond), it becomes easier to deal with a breakaway by fixo.
Coordination

When the ball moves, the defence must coordinate effectively and continue to keep in mind the following two points:
- Cut off the one-touch pass from fixo to the ala
- The second-line player on the opposite side of the ball should tighten up
As long as these two points are observed, the defence will not be easily broken down.
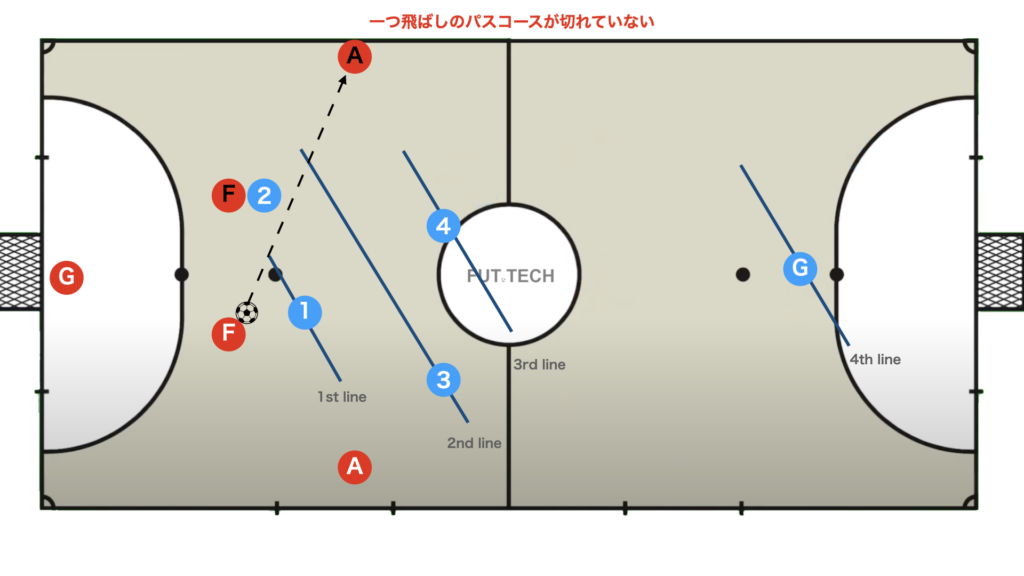
One-Touch Pass Route and Tightening of the Opposite-side Ala

Since the predominant defence against quatro is the box formation (2-2), we will explain the box defence.
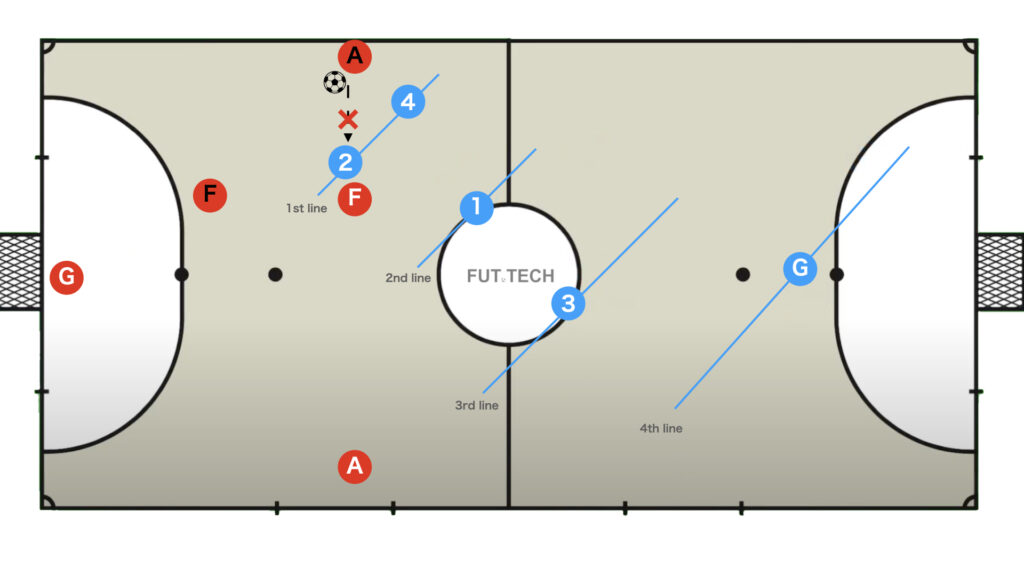
When the ball is with fixo, the second-line player on the opposite side of the ball holder (Blue No.4) should not stick too closely to the opponent; instead, as shown in the diagram above, they should constrict and manage the spacing between the 2nd and 3rd lines.
Bad Example ①: Insufficient Tightening

This is a typical bad example common among beginners: adjusting too much to the opponent’s formation leads to a trapezoidal shape and neglects the coverage at the back.
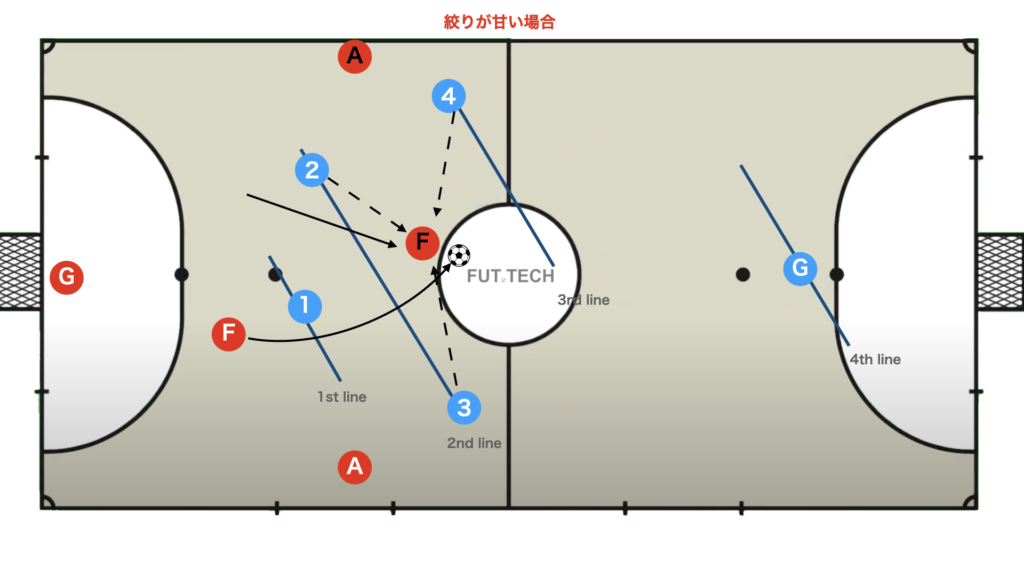
Defending in such a manner allows the opponents to exploit the space between the lines through duo plays (such as central paralela or central one-two), making it all too easy for them to progress to a shooting position.

This approach can lead to an easy progression to a goal.
Especially against a quatro where four players line up horizontally, neglecting the coverage at the back can easily result in conceding goals.
Bad Example ②: Allowing One-Touch Passes
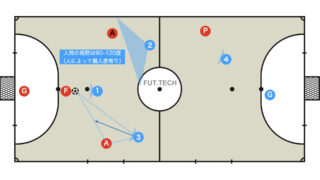
In reality, it isn’t the act of allowing one-touch passes that is problematic, but rather if Blue No.2 positions himself too closely to the opponent’s fixo, as shown above, it can create confusion when fixo makes a break for it.
Blue No.4 must cover the breakaway fixo, and Blue No.2 must press the ball holder (ala); however, from that position, the distance may be too great, allowing the ball to be advanced.
Defence Against 3 on Line
In futsal, especially in quatro, it is common to intentionally form a 3 on line in order to absorb multiple lines in attack.
Defending against a 3 on line is extremely challenging and is one of the most exciting aspects of futsal, where the tactical interplay between attack and defence is at its peak.
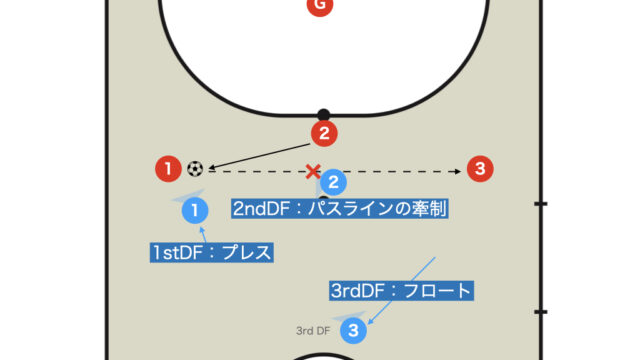
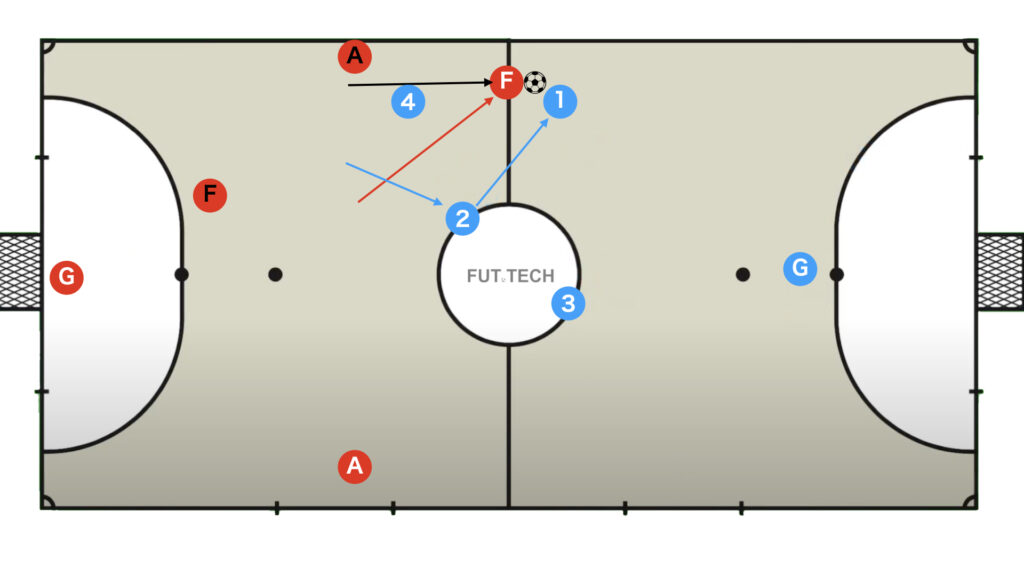
When the Ball Holder Is Under Pressure
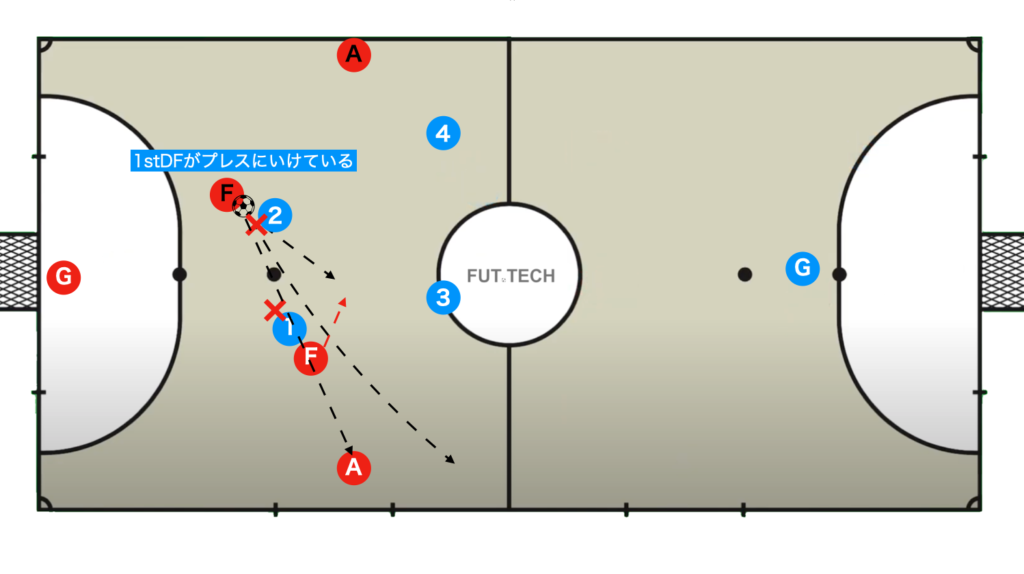
If the 1st defence is able to press the ball holder, they cannot release the ball to the back, so they must contain the remaining passing lanes.
As shown in the diagram above, Blue No.1 should move in front of the opponent to block the passing lanes to the two players behind.
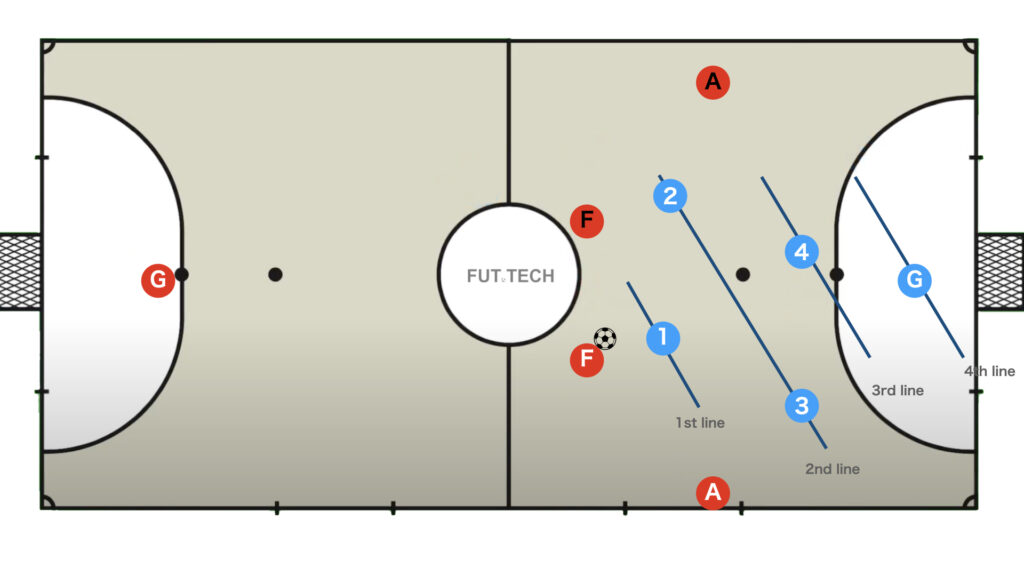
When the Ball Holder Is Not Under Pressure

For the central player in a 3 on line, it is crucial to maintain a proper distance and position oneself between the opponent and the goal.
So, what exactly is this proper distance?
It is the spacing that takes into account the following two points:
- A distance that allows you to just cut off a one-touch pass
- A distance where the opponent cannot effectively exploit the space between lines with an Ala Corta

If you cut off the one-touch pass route too much, as shown in the diagram above, the opponent will intrude into the space between the lines with an Ala Corta.

If you stand in front of the opponent to prevent an Ala Corta, you risk being outflanked from behind and having the space between the lines exploited.
However, if Blue No.3 clings too closely to the ala, then, as shown in the earlier example, it becomes difficult to deal with a run by fixo.
Therefore, although you generally do not want to allow one-touch passes that push up the line, the risk arising from cutting them off too much is greater, so you have no choice but to partly concede.
That is why the 3 on line is such a troublesome and powerful tactic.

If a one-touch pass is made in a 3 on line, the basic principle is to pass the marking responsibility of the breakaway fixo to the player behind (Blue No.3), while Blue No.1 presses the ala.
I repeat, if no marking exchange is performed in this situation, it leaves a vast space in the center lane, which is extremely risky.
Please check the scene where failing to execute a marking exchange against a 3 on line resulted in conceding a goal from a central paralela (via duo play) for an example.
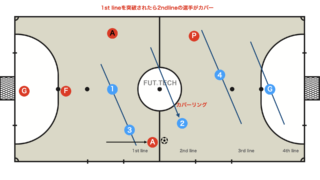
Response When the Defensive Organization Breaks Down on the Flanks

There are many teams—especially at higher levels—that take advantage of this marking exchange to execute a backdoor maneuver with the ala.
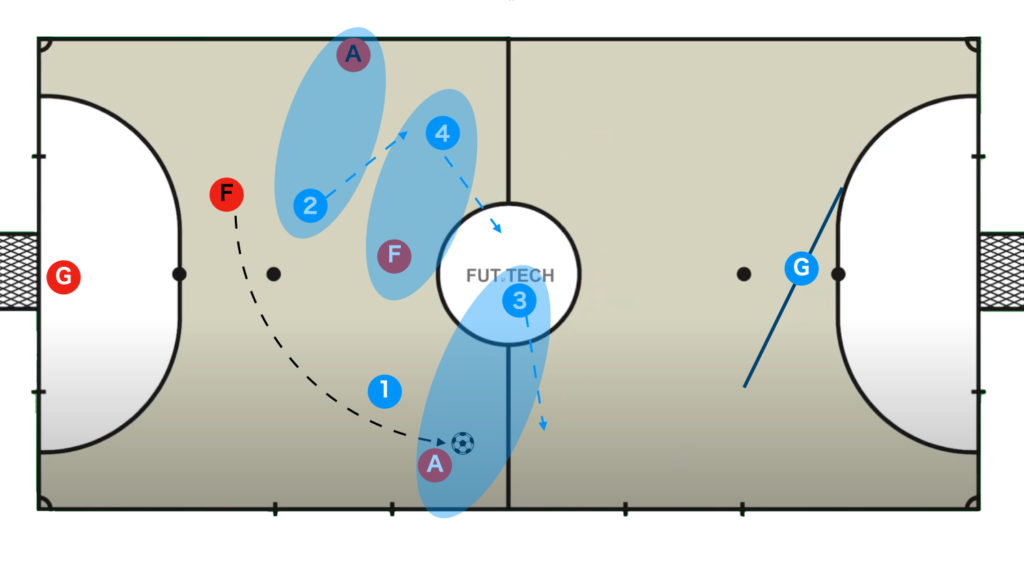
When the flanks are broken down, as shown in the diagram above, Blue No.3 should slide into position, shifting gradually into the vacant marking to rotate the defence.
This discussion focused on the backdoor; however, it is also an effective emergency measure when the defence is breached by a dribble breakthrough by the ala or through duo plays (one-two, paralela).
Triangle Defence
In a quatro attack, if the strong side forming a 3 on line shows no promise, shifting the play to the weak side can create a triangle formation.
The two main methods to break through the 2nd defence line in this situation are:
- Breaking down through duo play (between the ball holder and the player in the space between lines)
- An opposite-side ala backdoor
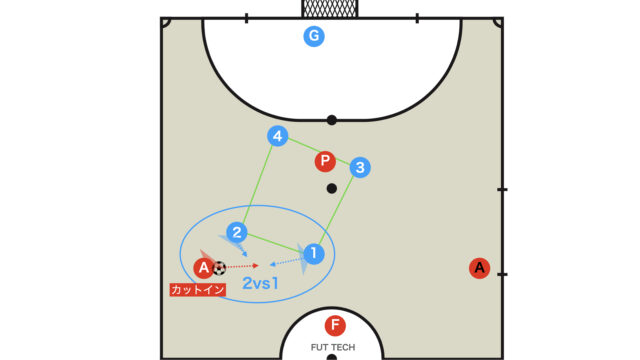
A Slightly Man-to-Man Approach
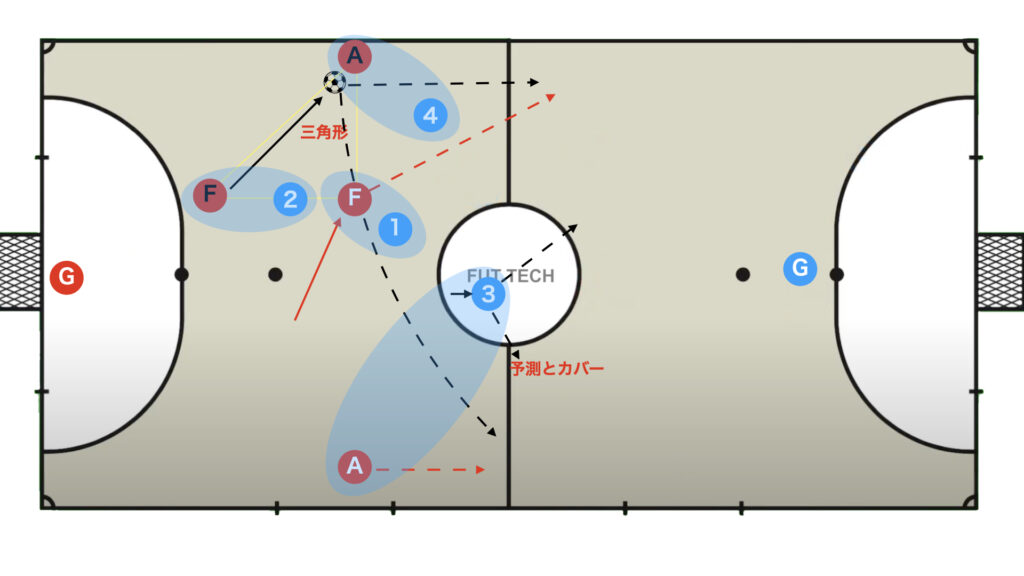
A slightly man-to-man approach has the advantage of continuously applying pressure through marking; however, it leaves the coverage at the back somewhat vulnerable.
The key here is for Blue No.3 to provide cover while anticipating a breakthrough of the 2nd defence line.
A Zonal Approach (Constructing Multiple Lines)
Although slightly off-topic from this article’s main focus, here we explain the zonal approach to constructing multiple lines.
- Blue No.4 goes to press = 1st Defence
- Blue No.2 restricts the space between the lines and cuts off one-touch passes = 2nd Defence
- Blue No.1 floats (forming the 2nd line) = 3rd Defence
If the 1st line is breached through plays such as paralela or one-two, the floating Blue No.1 will respond by providing cover.
It is also an option to selectively combine this with man-to-man defence.
Defence Against Quatro in the Half
The defence described in this article can similarly be applied to a half formation, where the team retreats into its own half.

Defence Against Quatro in a Y-Shaped Formation
Although it will not be explained in this article, there is also a method of defending against quatro with a Y-shaped, somewhat zonal defence, and quite a few teams employ this strategy.
However, since this inevitably creates a numerical advantage in the first and second lines, the author does not highly recommend it.
Summary
In this article, we discussed the box defence against quatro.
Since quatro aims to effectively utilize the space behind, it is crucial for the players at the back to always be mindful of covering that area.
Because attack and defence are two sides of the same coin, understanding the attack is also very important when learning about defence.
There is also an article that explains quatro in detail, so if you’re interested, please take a look at it!
Thank you very much for reading this article to the end.
If you found this article useful, please consider sharing it using the social media share buttons above.
We regularly share valuable insights on futsal tactics on Twitter, so if you haven’t followed us yet, we’d appreciate your support!
We are committed to raising the level of futsal in Japan by sharing high-quality information through discussions with individuals who have coaching experience in the F.League and overseas.
If you have any questions or notice any mistakes, feel free to leave a comment below.
We update our articles regularly, so if you’d like to keep reading, please bookmark our site or search for “FutTech”!