The corner kick with a triangular initial positioning is arguably the most orthodox corner kick, widely used by both amateurs and professionals.
This set-piece offers several options (patterns), so even if one is anticipated, another option can be chosen.
One of the reasons this set-piece is widely used is that it allows for flexible adjustments based on the opponent, consistently increasing the chance of scoring.
In this article, we provide a thorough explanation of all the options and their essence.
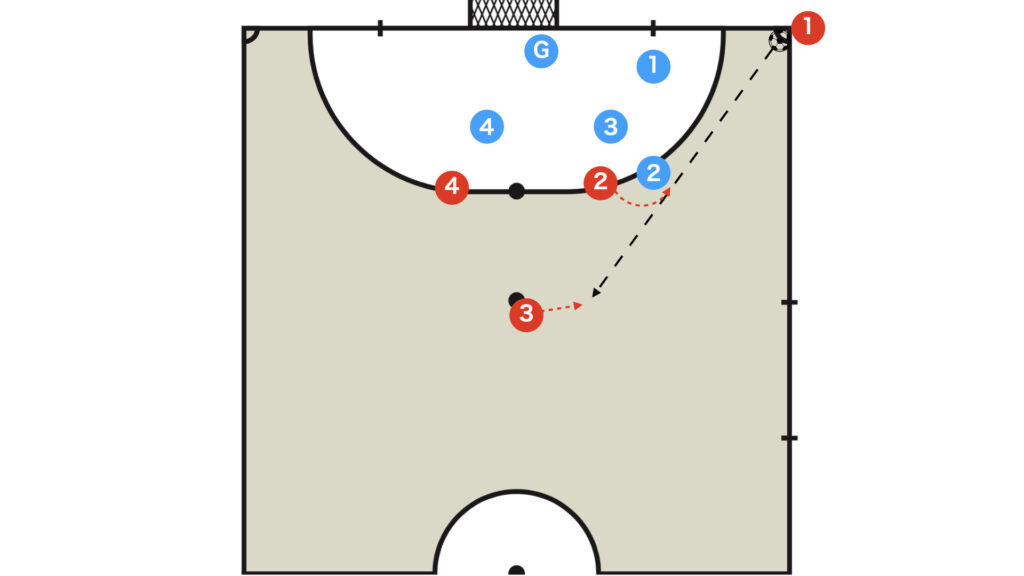
Initial Positioning and Roles
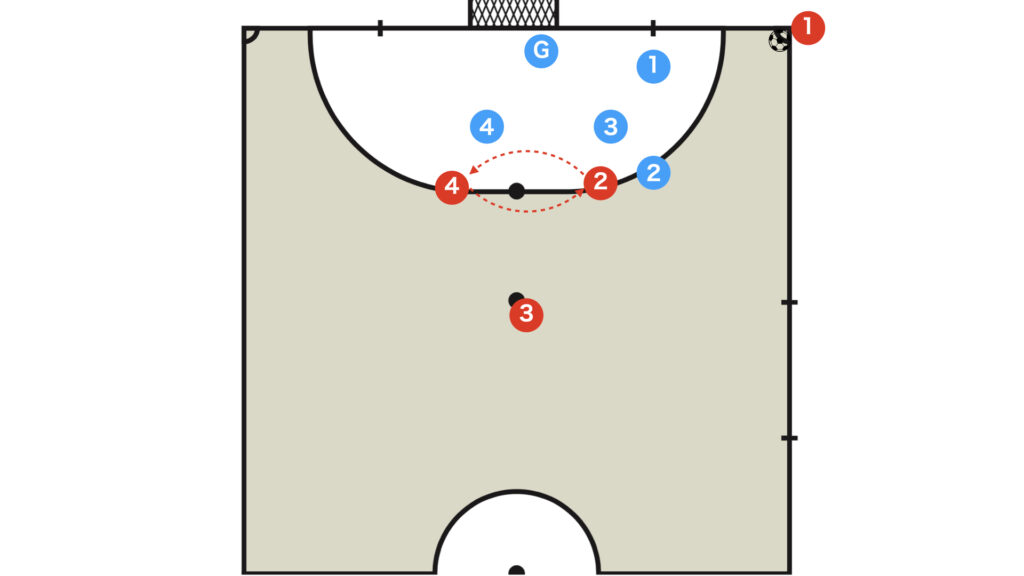
Initial Positioning
- Triangle
- The first two players (Red 2 and Red 4) are positioned along the penalty area line
- The player at the back (Red 3) is positioned at the second penalty kick mark
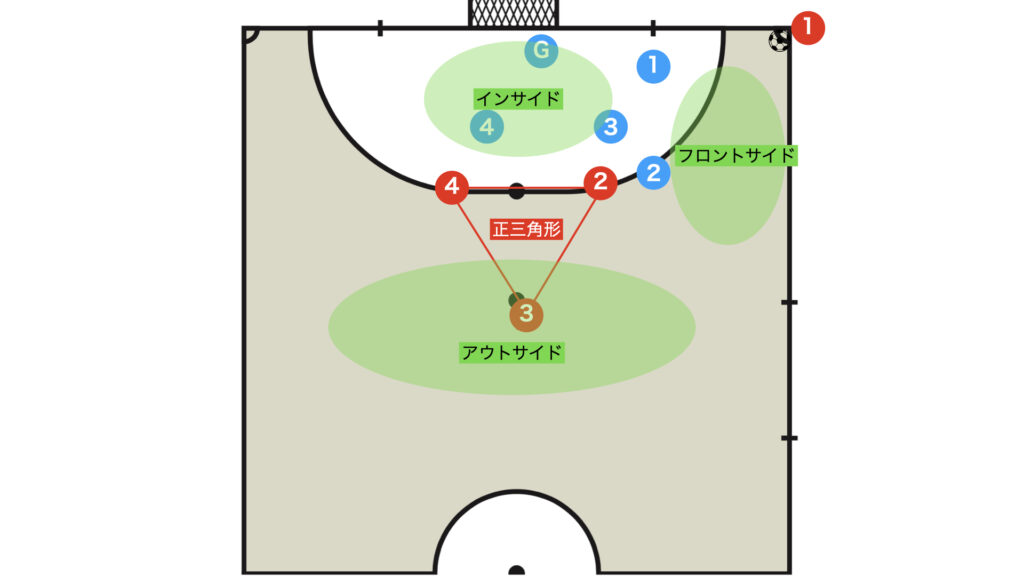
The target sides (zones) for this corner kick can be divided into the following three:
- Out (outside) side
- Front side
- In (inside) side
The finishing zones, in the order of Inside > Front side > Outside, pose a significant threat to the opponent.
However, since a well-organized team won’t easily leave the inside open, you must approach them in the reverse order.
- Outside
- Front side
- Inside
Roles: Who to Position Where?
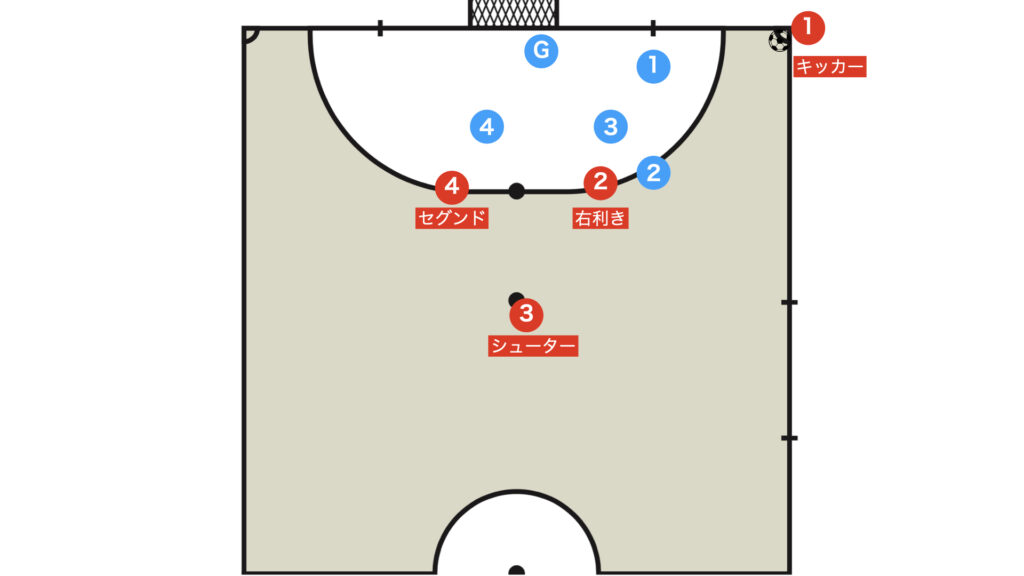
In all set-pieces, the placement of players is extremely important.
Quickly set up based on the players’ abilities and the skills required in that situation (location).
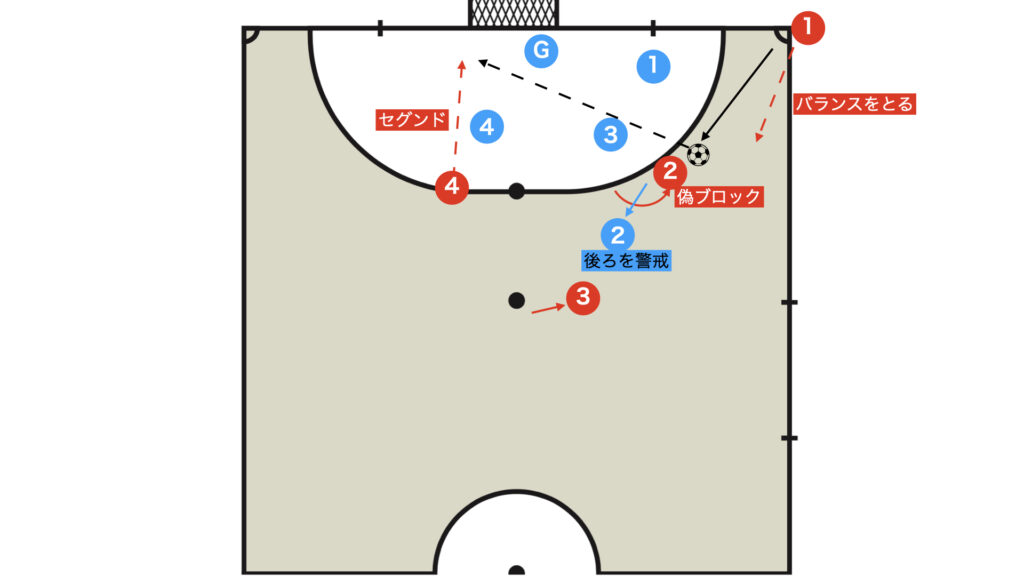
Pattern 1: Start by Using the Outside
Pass the ball backward on the ground for a mid-range shot
Red 2 moves around in front of Blue 2
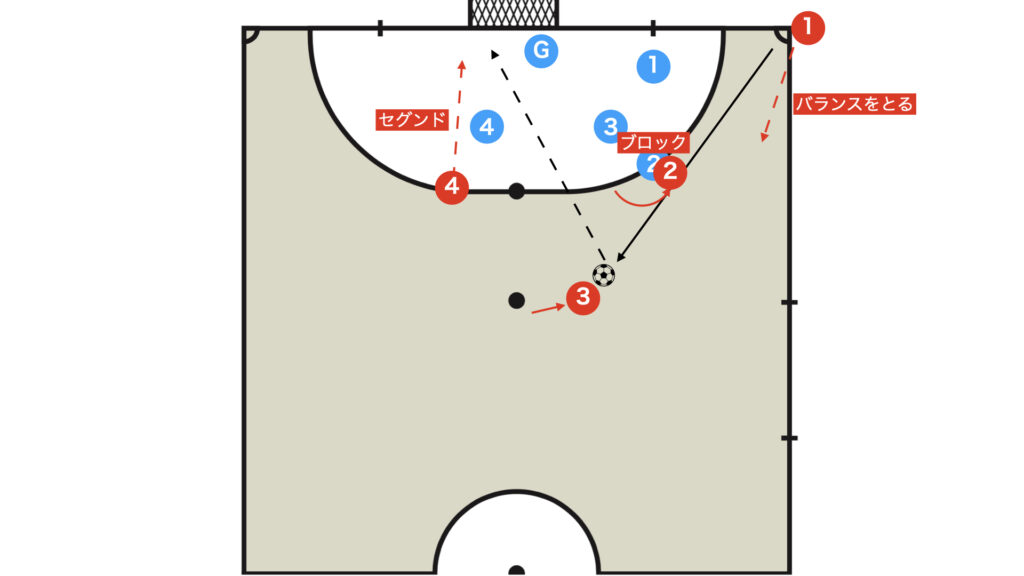
- Red 1 drops back to around the height of Blue 3 to guard against counterattacks
- Red 2: Feigns a shot to block Blue 2 and, with a through pass, secures a passing lane to Red 3
- Red 3 takes a middle shot (preferably direct)
- Red 4 serves as the segundo

Volley Shot
If Red 3’s dominant foot is the opposite or if they excel at volleys, they can opt for a volley shot instead of the passing the ball backward on the ground for a mid-range shot.
- Red 1 serves as the segundo
- Red 2 performs block & balance (with awareness of covering against counterattacks)
- Red 3 takes a volley shot
- Red 4 focuses on blocking
It is often overlooked, but it is a fundamental rule that the kicker during a volley shot should be the segundo.
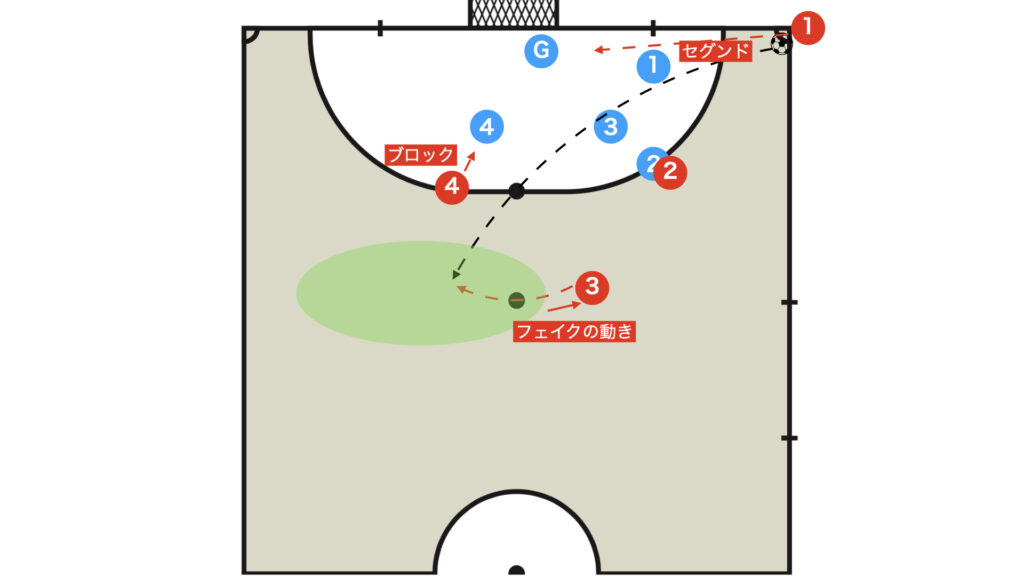
Pattern 2: Using the Front Side
Overusing the passing the ball backward on the ground for a mid-range shot will eventually cause the opposition to become cautious, which can result in Blue 2 moving back, as shown in the diagram.
In such situations, it is effective for Red 2 to take a shot from the front side.
Additionally, you can attack the front side by taking advantage of Blue 2 breaking free after maneuvering around Red 2’s block (using a fake block).
By blocking, the opposing player is made aware of being obstructed, and when they maneuver around the block to free themselves, you can take advantage of that moment.
(The more obviously you execute the block, the more likely the opponent will try to bypass it.)
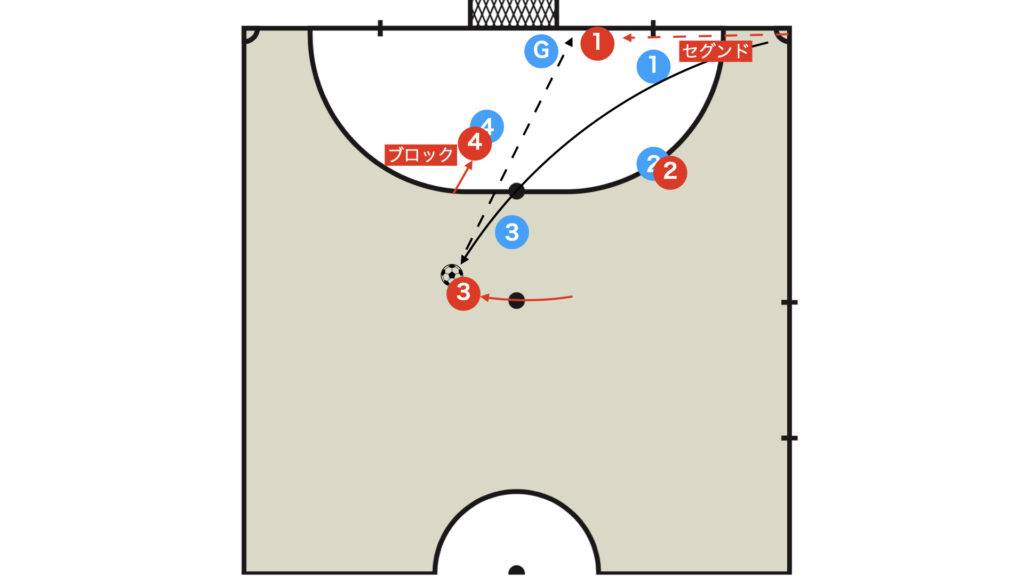
When the Second Player (Blue 3) Joins in a Bit Late
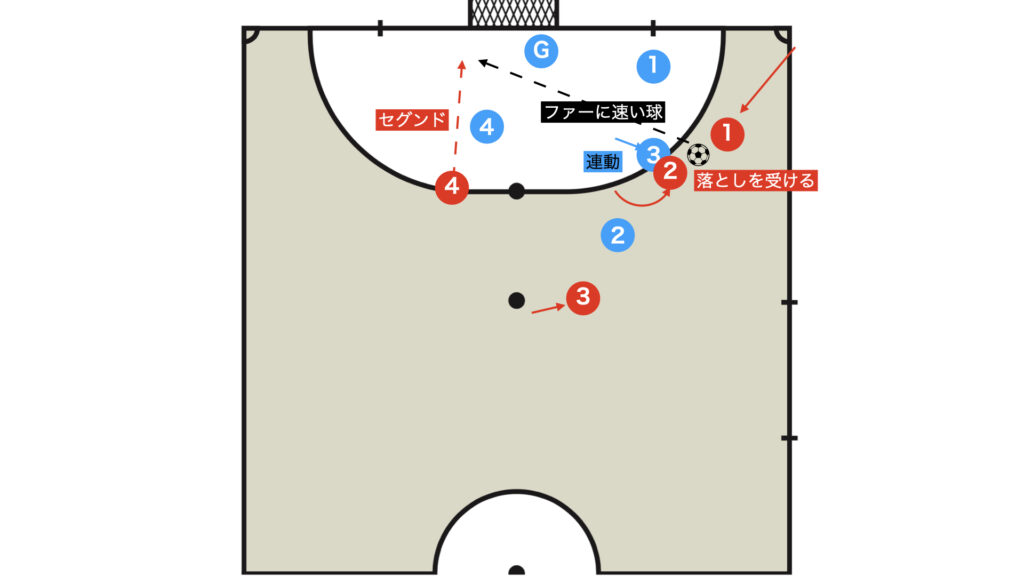
If you expected to use the front side but Blue 3 responds a bit too late, then a shot cannot be taken.
In that case, it is effective for Red 1 to drop the ball using the inside of their foot (the foot farthest from the opponent) and supply a fast pass to the segundo.
It is also effective for Red 1 to overlap Red 2 and pass with a pisada (heel).
(Red 2 then takes on a role similar to that of a pivo.)
However, this is not recommended due to the risk of getting caught between Blue 2, leading to a counterattack.
Pattern 3: Using the Inside (Middle)
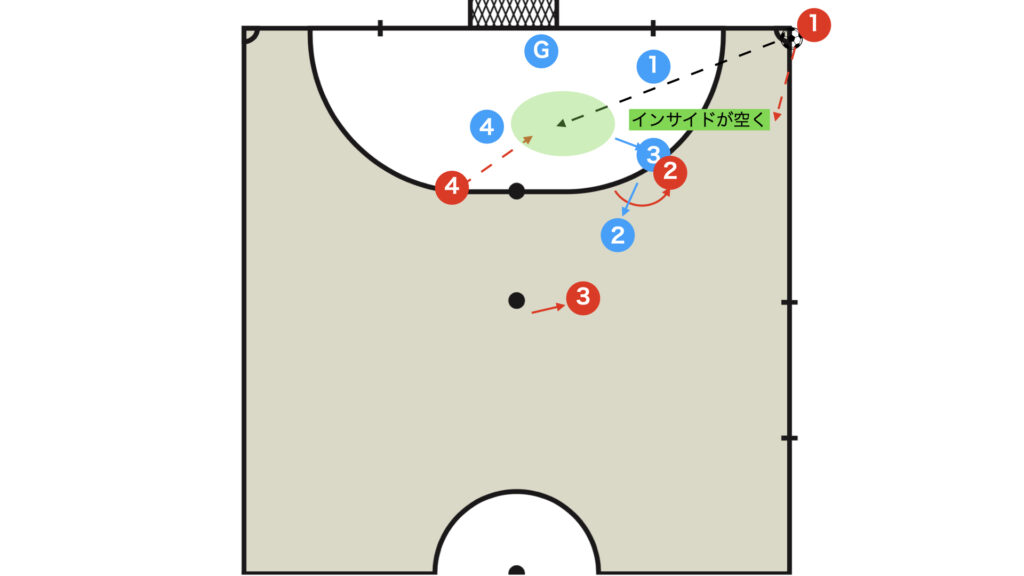
When Blue 2 and Blue 3 move in unison (with a one-on-one mindset), the inside opens up.
By attacking from the outside and front side, you threaten the opponent, naturally creating an opportunity to exploit the inside.
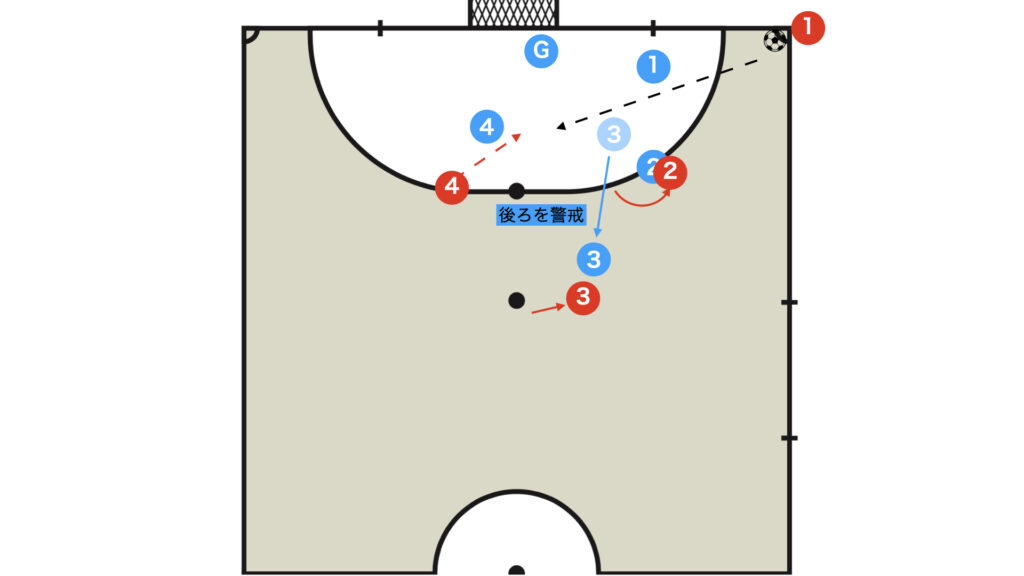
In some teams, there are cases where Blue 3 comes forward.
Attacking from the Air: Delivering a Lofted Ball
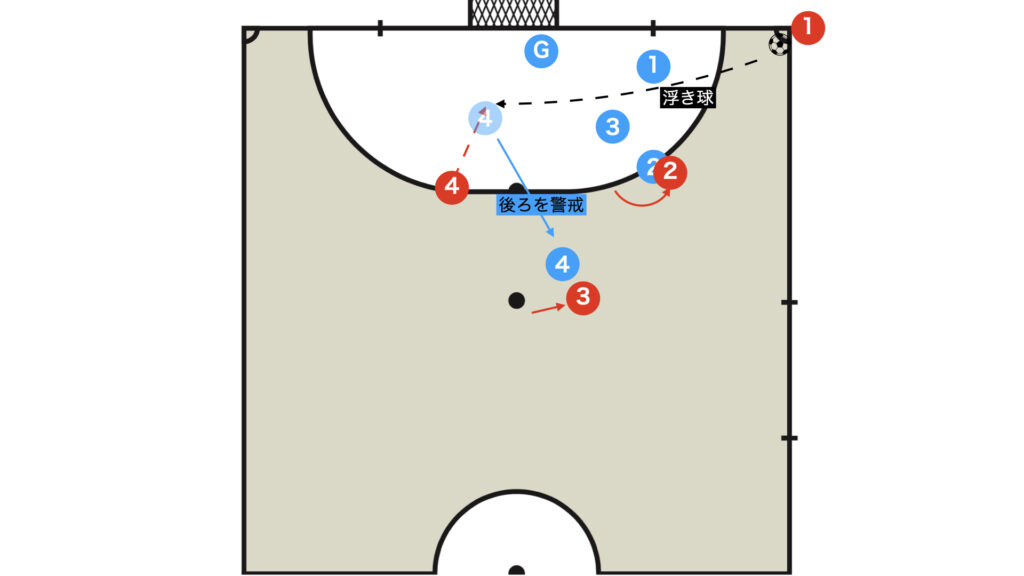
It is not ideal, but in some cases, teams have Blue 4 from the far side come forward.
In such cases, although Blue 4 becomes free, ground passes are difficult to thread through, making a lofted ball effective.
If you strike a ball at head height with a liner and execute a header shot, the opponent can hardly defend it.
A lofted ball is effective not only in this set-piece but in all situations.
Summary
How did you find it?
With set-pieces, it’s not just about increasing variety; it is extremely important to enhance the quality of each one.
If you find any option in this article that your team hasn’t previously utilized, we recommend introducing it to your team.
When the first two players (Red 2 and Red 4) perform a position change, it becomes easier to shake off the opponent’s marking.
(A fake position change or a double switch back can also be effective)
Once you get accustomed, we recommend adding the position change option to your team.
Thank you very much for reading this article to the end.
If you found this article useful, please consider sharing it using the social media share buttons above.
We regularly share valuable insights on futsal tactics on Twitter, so if you haven’t followed us yet, we’d appreciate your support!
We are committed to raising the level of futsal in Japan by sharing high-quality information through discussions with individuals who have coaching experience in the F.League and overseas.
If you have any questions or notice any mistakes, feel free to leave a comment below.
We update our articles regularly, so if you’d like to keep reading, please bookmark our site or search for “FutTech”!